


Table of Contents
The High-Starter Method: Fast-Track Your Sourdough.
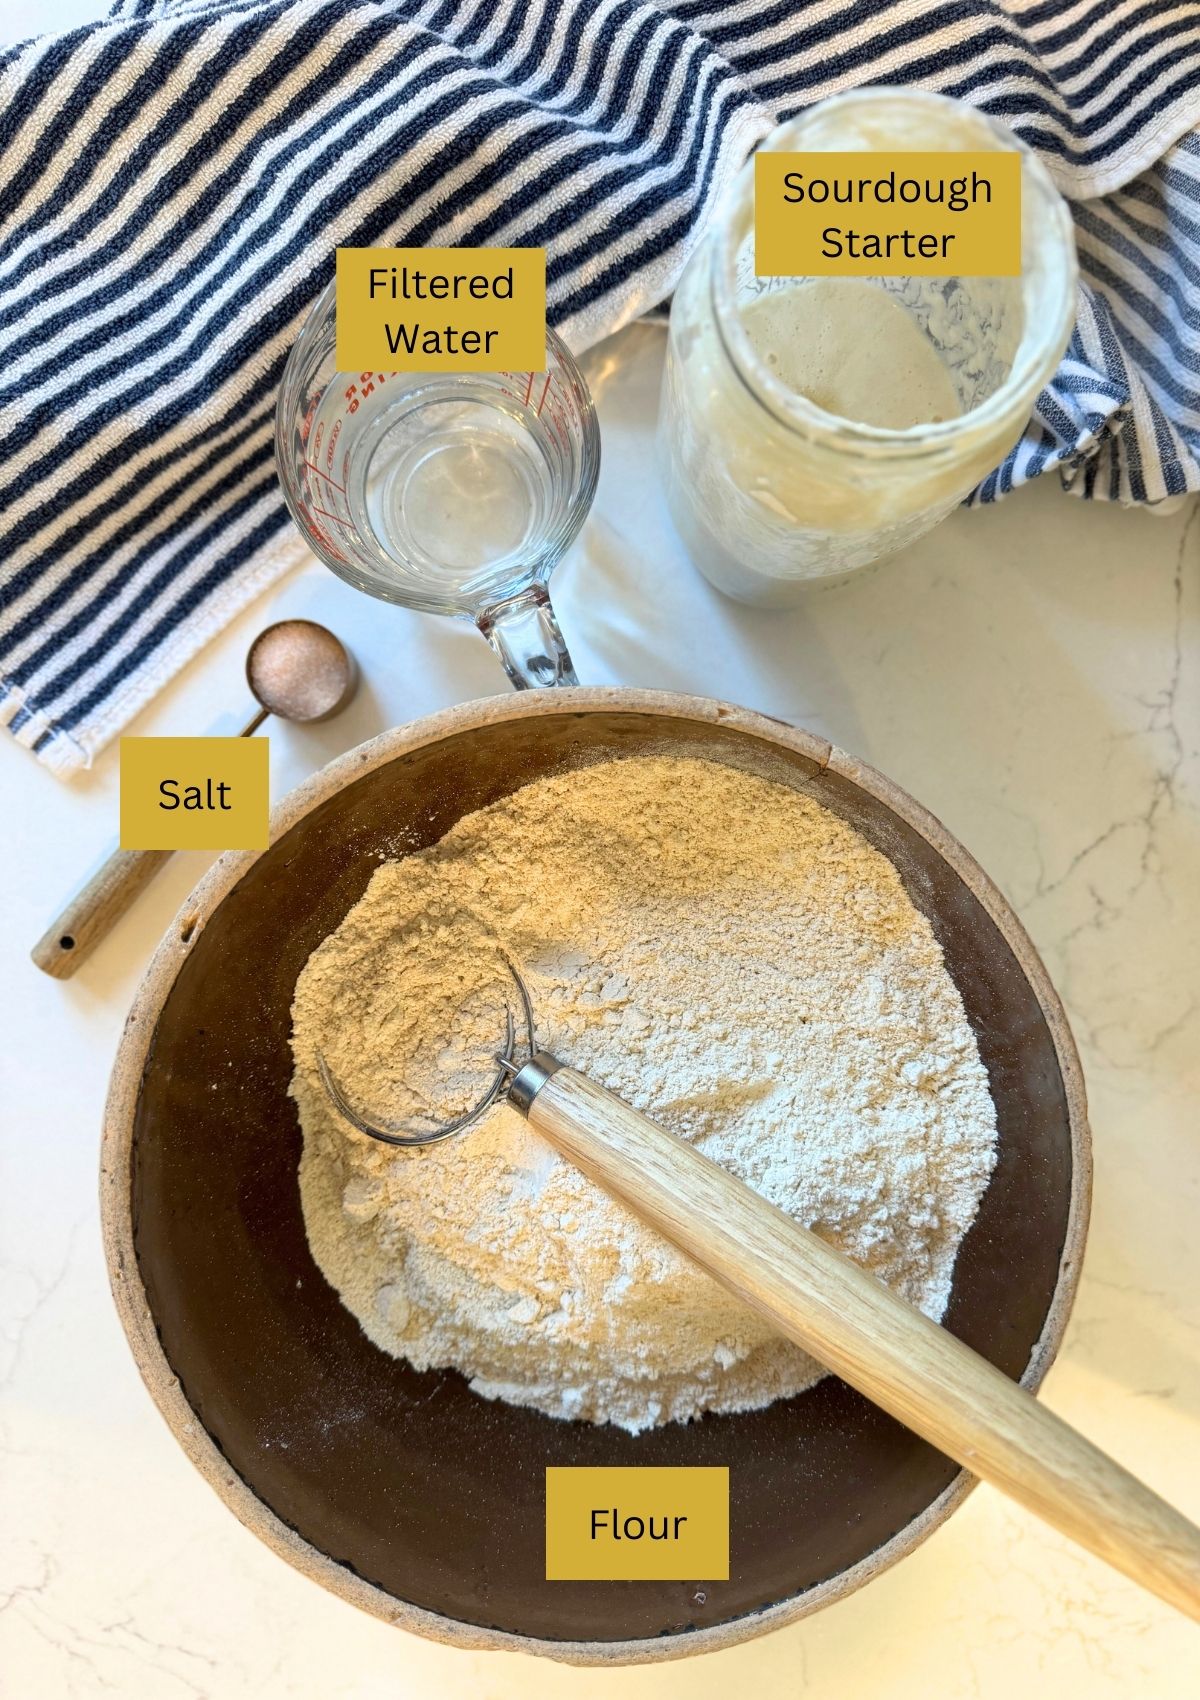
Ingredients & Tools

Basic Tools: These tools make making sourdough bread easier and can help it to turn out fluffier and prettier. But you can most definitely make sourdough bread without some of them! Here are the tools I use:
- Large Mixing Bowl
- A Bench Scraper – to keep sticky dough off the counter and in your loaf.
- Dutch Oven – For best results use a Dutch oven with a lid. (Dutch ovens with lids hold in moisture while cooking bread causing the bread to rise more, or spring, better than cooking on a baking sheet or pan.)
- Parchment Paper – This is a luxury, not a necessity but I really love using it!
- Proofing Basket or Banneton or towel lined bowl – These baskets give your loaf those pretty circle designs around the loaf as it shapes into the basket over night.
- Tea Towel to Cover the rising dough with.
- A Wooden Spoon or Danish Whisk
- *Optional stand mixer with a dough hook. I just use my Danish whisk and hands.
- Razor or very sharp thin knife for scoring.
Sourdough Terms
I know when you’re just starting, terms like “autolyse” and “lame” can sound like a bunch of kitchen gibberish! But trust me, understanding these terms is the key to mastering your loaf. Here are the common sourdough terms you need to know to feel like a pro:
Sourdough Starter: Homemade sourdough starter is a natural yeast, made from collecting wild yeasts from grains and in the air, that collect and grow in a mixture of flour and water. These wild yeasts make the dough rise as they ferment it! Choose a non-reactive container for your starter glass jars work great. (Avoid metal containers, some metals react with the acid in sourdough and affect the fermentation process.)
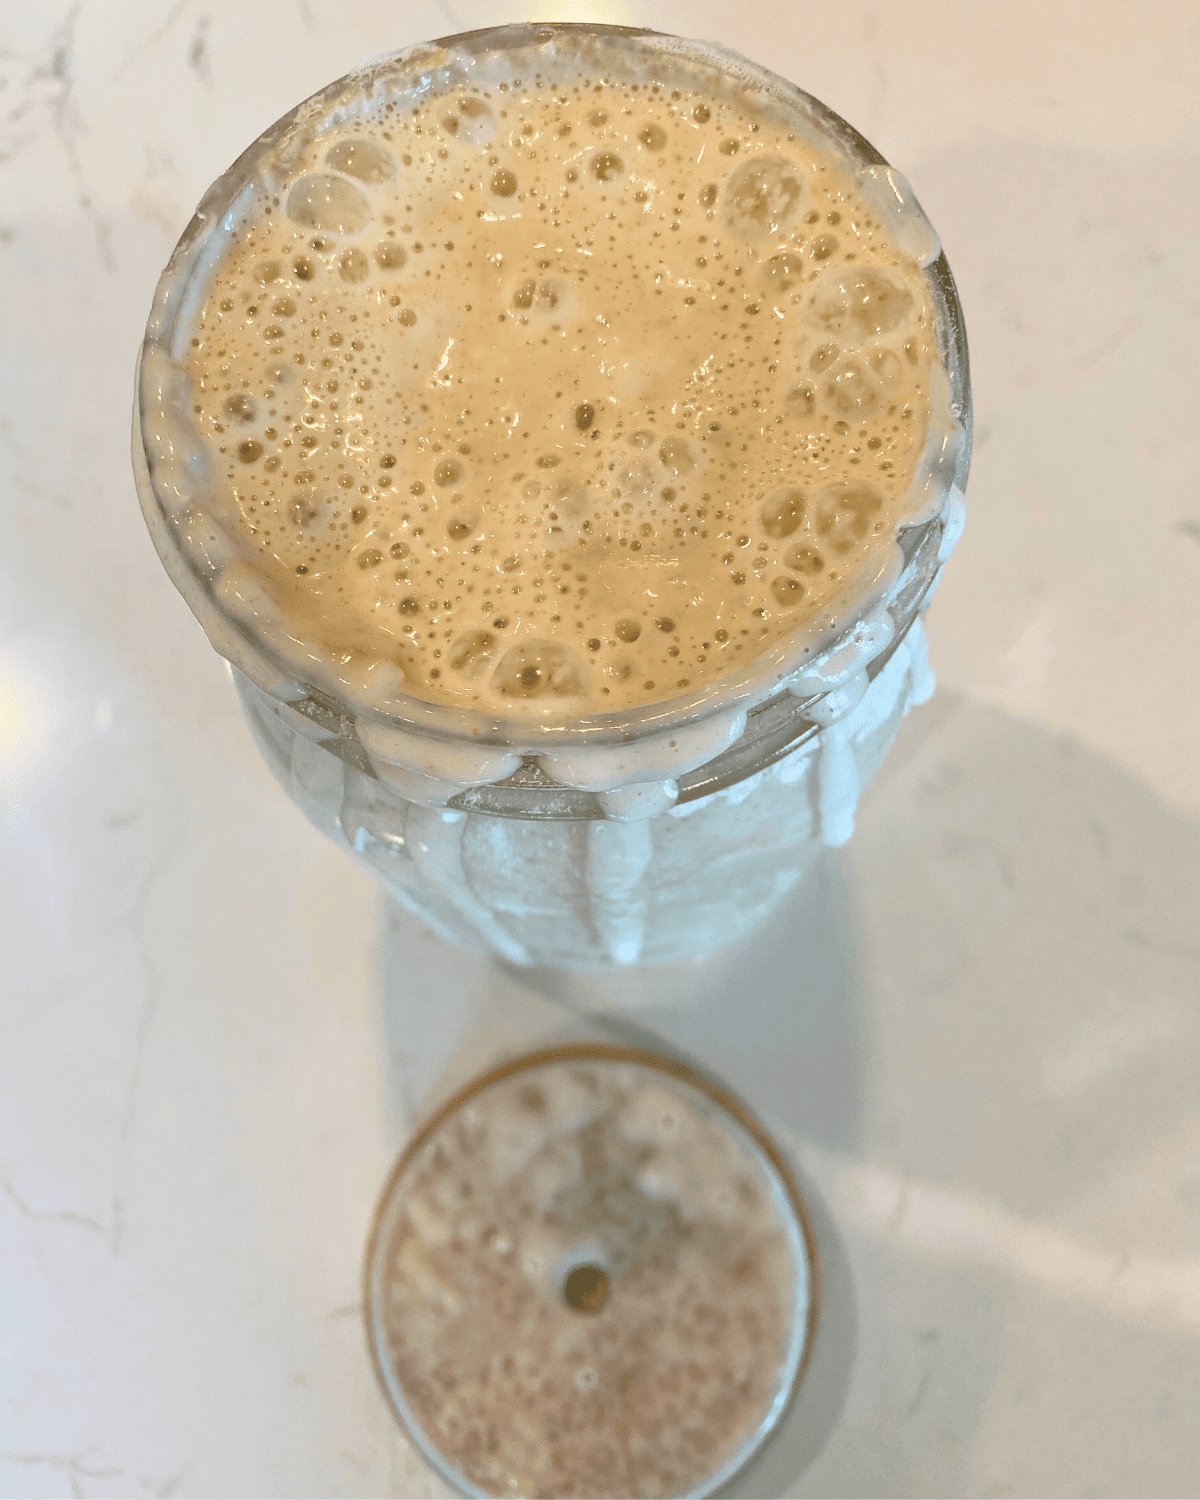
This sourdough starter is allowed to ferment for several days to develop the wild yeast and lactic acid bacteria, which give sourdough its unique flavor and leavening ability in breads. The active starter is nice and bubbly, and that’s the way you want it for use in this recipe.
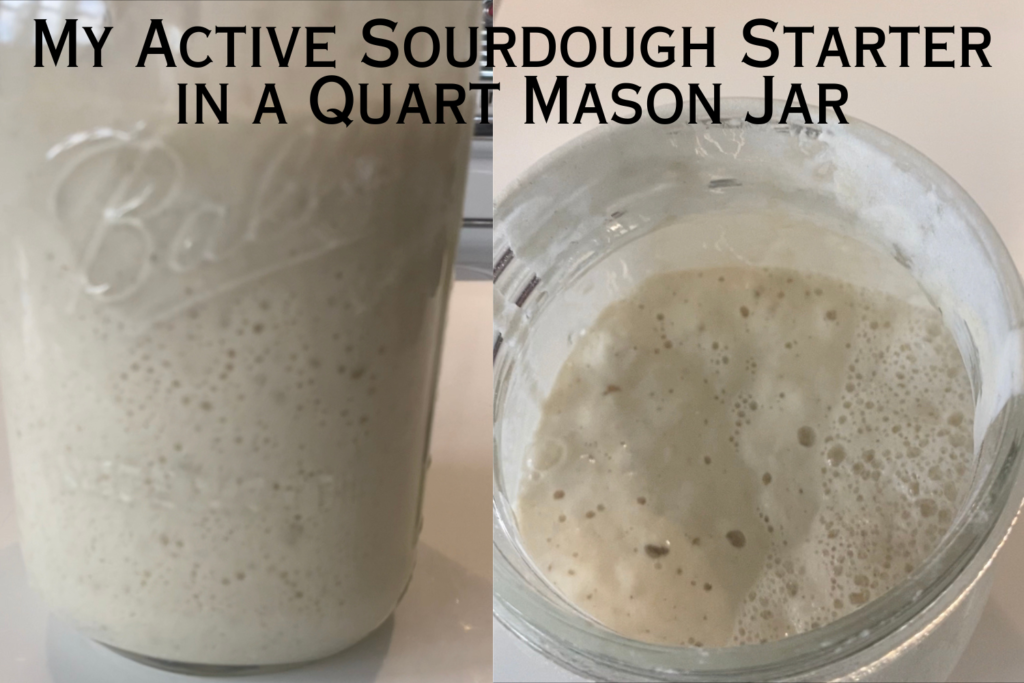
Active-Fed Starter: This means your starter has been recently fed (with equal parts flour and water, by weight) and has doubled or tripled in size and is full of bubbles. This is when your starter is at its peak power! If a small piece floats in a glass of water (the “float test”), it’s ready for baking.
Sourdough Discard: This is the portion of starter you remove before feeding the main jar. It prevents your starter from growing too big to manage. NEVER TOSS IT! Use it right away to make amazing things like pancakes, crackers, or even my Chocolate Sourdough Loaf!
Autolyse: This is just resting! It’s the optional process of mixing the flour and water together first and letting them sit for 30–60 minutes before you add the starter and salt. It helps the flour hydrate completely and makes your dough more pliable, giving you a better texture in the final loaf. I skip it, but you can add it if you want to geek out!
Bulk Fermentation / Bulk Rise: The first, and most crucial, long rise your dough takes after mixing the ingredients. It’s the period where the sourdough starter gets to work, making the dough puff up. Patience is key! This step builds flavor and creates the dough’s structure. We keep this faster by using more starter (2 cups!) so you can finish the dough in one day.
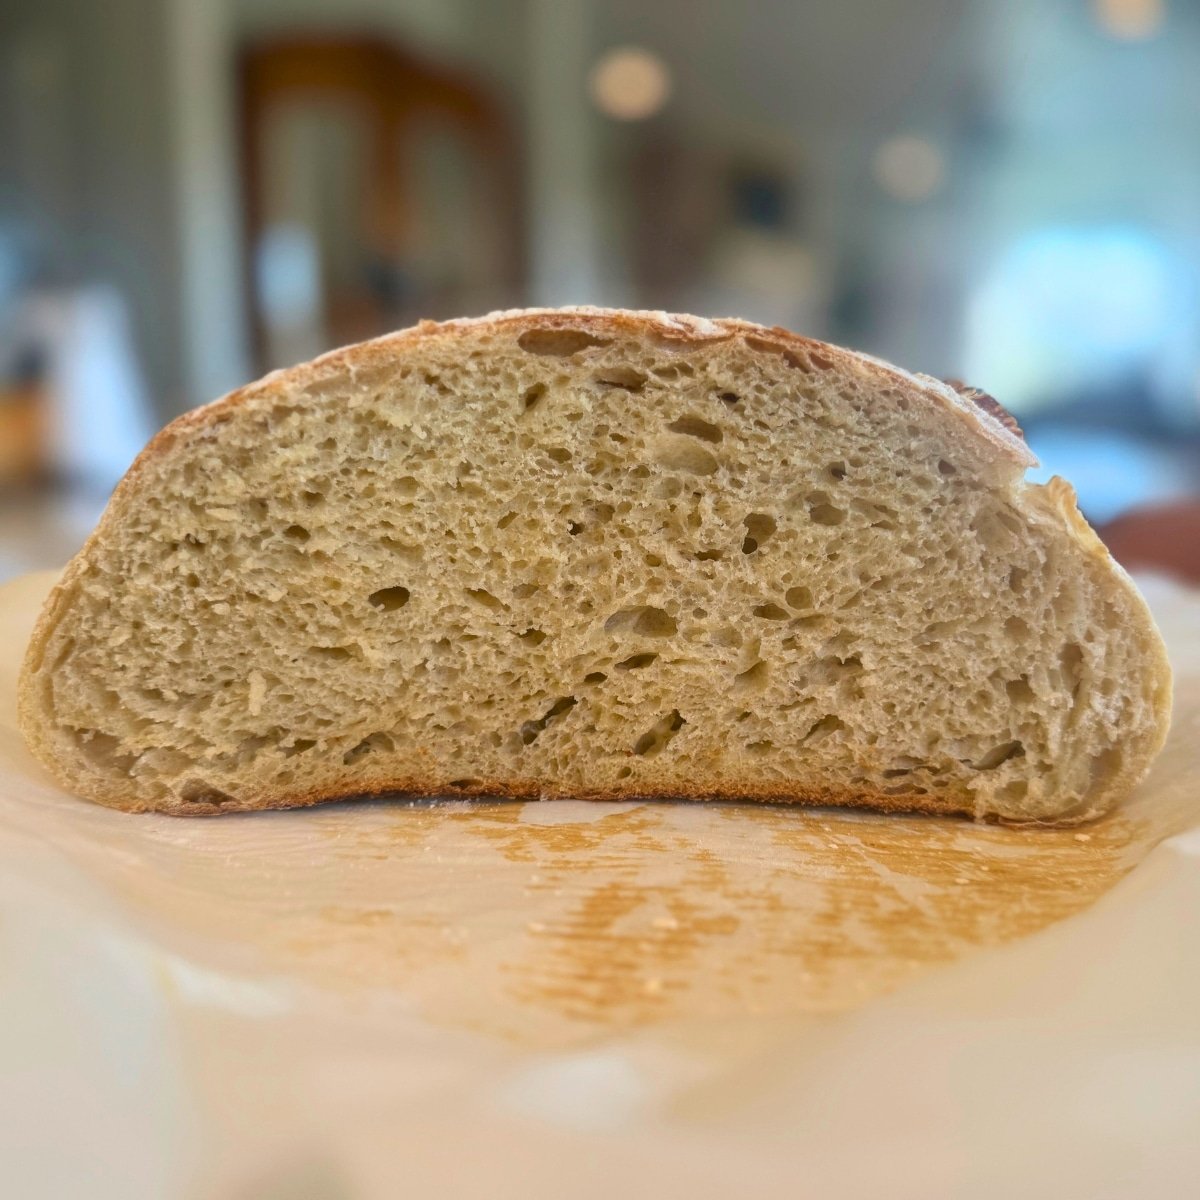
Stretch and Fold: Instead of kneading the dough like a maniac, you gently grab the edge of the dough and fold it over itself several times. We do this 4 times in this recipe. It’s the no-knead way to develop gluten structure so your bread can hold all those beautiful air holes (the crumb) without turning into a pancake!
Proofing (or Final Rise): The very last rise the shaped dough takes right before it goes into the oven, usually done in a proofing basket (banneton) in the cold fridge. This overnight chill develops a complex flavor and makes the dough firm, which is key to making those gorgeous, clean cuts when you score the top!
How to use Sourdough Starter
Take the Starter out of the Fridge: If your sourdough starter has been refrigerated, take it out and let it come to room temperature for a few hours. It’s best to use a well-fed and active starter for baking.
Before using the starter, it’s a good practice to feed it to ensure it’s active and strong. Add equal parts of water and flour to your starter. Learn more about activating your starter here.
The amount of active starter you need is 2 cups (400 grams) for this recipe. Because our High-Starter Method relies on this exact quantity, please see the IMPORTANT Prep Your Sourdough Starter Note at the bottom of the recipe card for accurate feeding instructions.
Once your starter is active, you can incorporate it into your sourdough recipe. After using the portion of starter for your bread, don’t forget to feed and maintain the remaining starter. If you’re not baking frequently, you can return it to the refrigerator and feed it regularly (weekly or bi-weekly) to keep it active;)
This Recipe Can be Ready by Dinner!
This fast sourdough bread recipe uses a high-starter method to keep the entire process to a single, efficient day! To use this timeline your kitchen or proofing area needs to be at least 75 degrees F… It’s works best in the summer for me this way. When it’s colder I use a warmed oven!
Previous Night (e.g., 8 PM) – Feed Starter: Give your starter its meal now and leave it on the counter overnight. This guarantees your starter is at its peak activity—bubbly and ready to give your dough a powerful lift first thing in the morning.
8:00 AM – Mix Ingredients & Initial Rest: Combine the active starter, warm water, flour, and salt. Cover and let it rest on the counter for 1.5 hours. This initial rest hydrates the flour (Autolyse Light) before we start building the gluten structure.
9:30 AM – First Stretch & Fold: Complete your first set of stretches and folds (4–6 turns). We’re starting to build the strength the dough needs for a good rise.
10:15 AM – Second Stretch & Fold: Cover and repeat the process. (45 minutes rest)… The dough should start to feel smoother and stronger now.
11:00 AM – Third Stretch & Fold: Cover and repeat. (45 minutes rest). Maximizing the structure for excellent oven spring!
11:45 AM – Fourth (and Final) Stretch & Fold: Cover and repeat. (45 minutes rest)… Your dough is now strong, smooth, and ready for its final shape.
12:30 PM – Shape & Chill (Bulk Ferment/Proof): Shape dough… Place the bowl into the refrigerator to chill and rise for 4−8 hours to finish the bulk fermentation. Due to the high starter volume, this controlled cold chill prevents over-fermentation and develops flavor!
4:30 PM (or when 4-8 hours are up) – Preheat Oven: Preheat your oven and Dutch oven to 400°F for 30 minutes. We need a screaming hot Dutch oven to lock in moisture and create that perfect, crispy crust!
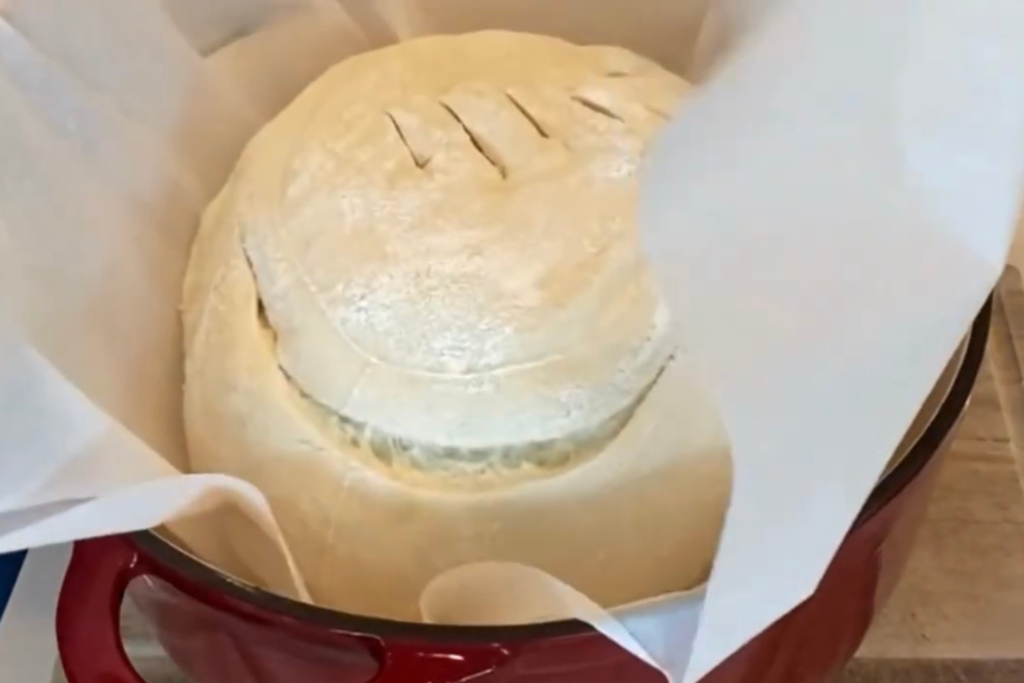
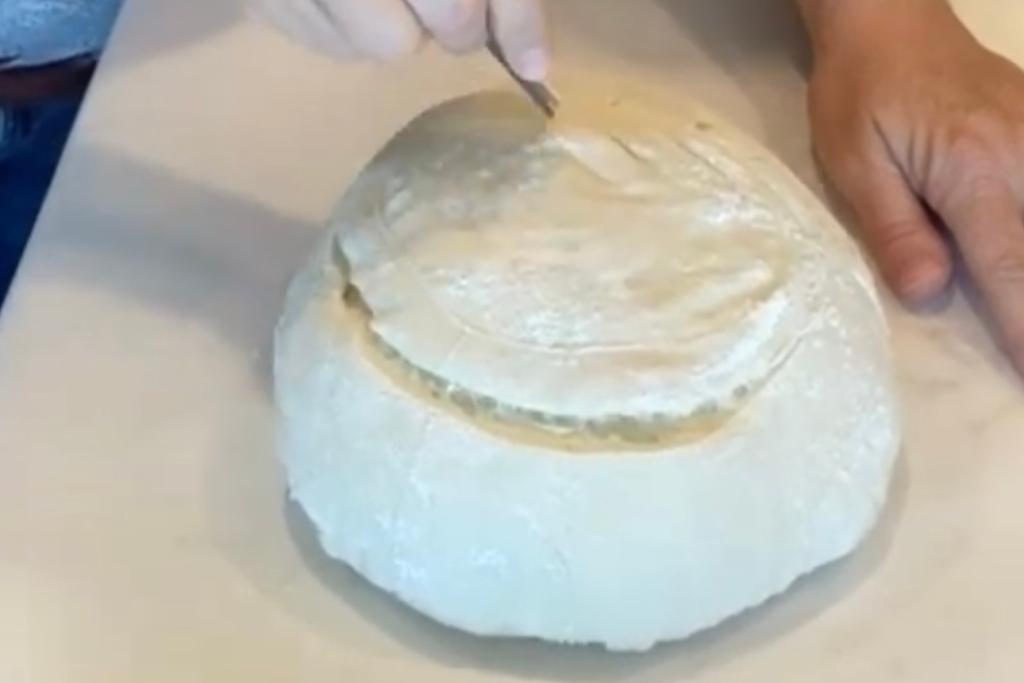
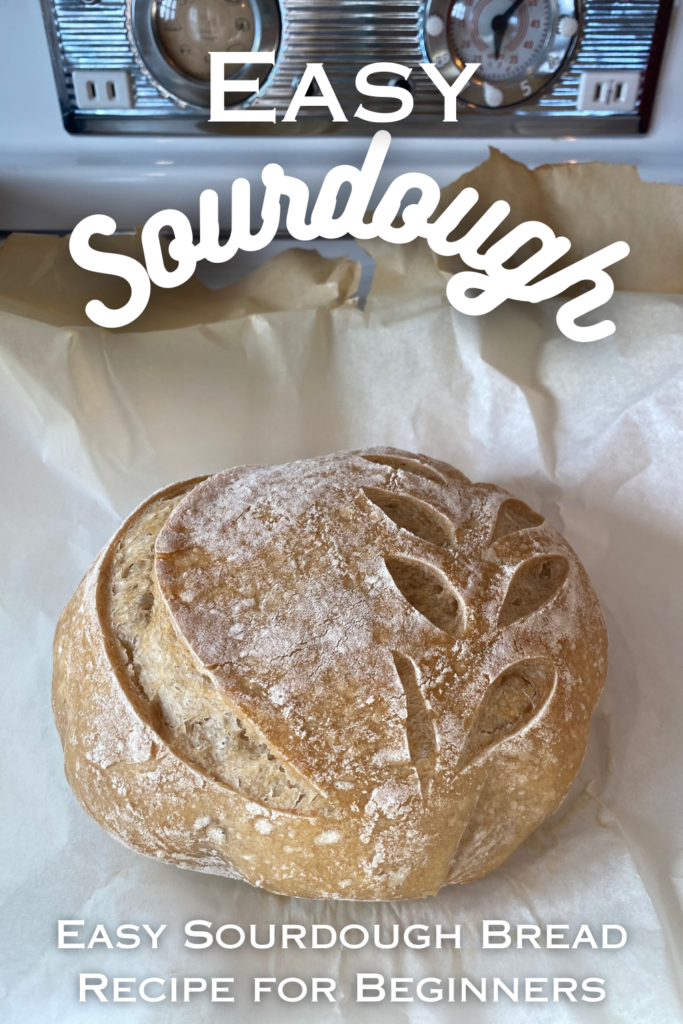
5:00 PM – Score & Bake: Cut a 2-foot section of parchment and place it on your counter, and gently turn out your chilled bread dough ball onto a large piece of parchment paper. Lightly dust the top with flour, and spread it evenly over top with your hand, being careful not to push the dough down. Score your design. This gives the loaf a constructive place to rise without bursting open during the baking process. Transfer it to the hot Dutch oven, and cover with lid. Bake covered for 25 minutes. Get ready to see that oven spring!
5:25 PM – Uncover & Finish: Carefully remove the lid and bake uncovered for 25 minutes more until deep golden brown. This is what finishes the crust perfectly.
5:50 PM – Cool: Remove the loaf and cool completely on a wire rack before slicing. Your fresh, same-day loaf is ready for dinner!
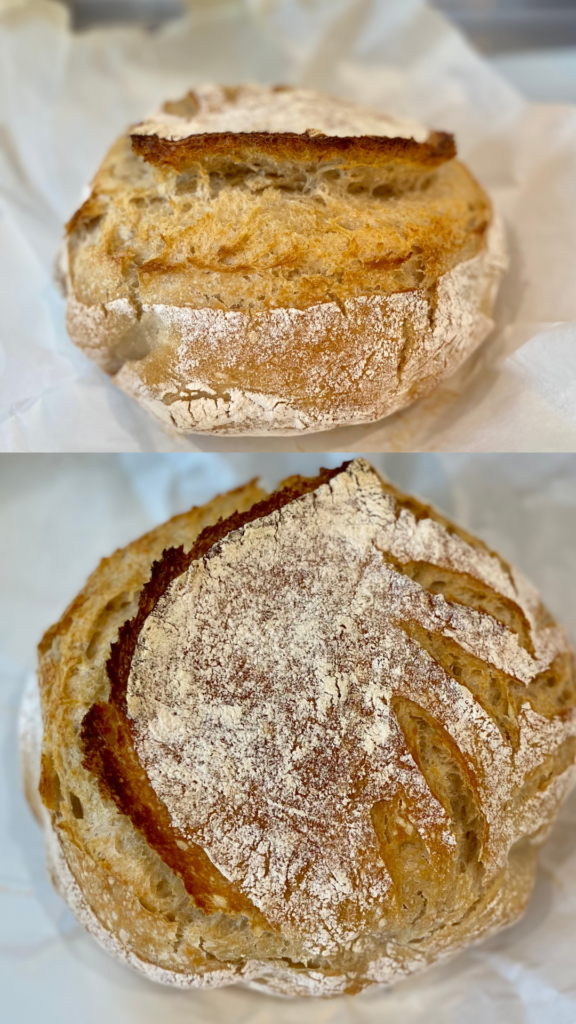
Place your sourdough bread on a cooling rack and cool completely to see all the beautiful air holes! If you cut into your loaf of bread right away the bread will be too soft to hold its form with all the beautiful air holes. It will taste amazing but doesn’t look quite as wonderful. Enjoy!
How to Store Leftovers
If you are lucky enough to have leftovers, place your homemade bread into an air-tight container or zip-lock bag, and store it on the counter for up to 4 days. If you store in the fridge the bread will get firmer, and not be as soft, but it softens up right away if you reheat it! (I think the best way to reheat sourdough bread is to pan-toast it with butter for breakfast!)
Leftover sourdough bread is also great to make croutons, the best French toast, bread pudding, or hot and cold and sandwiches!
My Tips & Tricks
- Good-quality flour and filtered, or unchlorinated, water are essential for a flavorful and successful sourdough bread. Chlorine in your water damages the probiotic sourdough and can make it less effective. Bread flour has more gluten and rises better. Whole-grain flours can add depth to the flavor.
- Fermentation is temperature-sensitive. If your kitchen is cold, consider placing the dough in a slightly warmer environment, like a turned-off oven with the light on, to facilitate the fermentation process.
- Autolyse: I don’t do this in this recipe, because it always works well for me the way it’s written. But you CAN autolyse your flour with water before adding the other ingredients to improve it. To autolyse: Mix your flour and water in a large bowl first, to hydrate together for 30 minutes to an hour, then add the the starter and salt. This helps improve the dough’s extensibility & structure.
- Longer fermentation times at lower temperatures (bulk fermentation) help develop a more complex flavor. Be patient and let the dough ferment at room temperature or in the fridge for 4 hours, it should puff up a bit, but not all the way. If it goes too long in the fridge it will over ferment and fall as it bakes.
- During bulk fermentation, use the stretch and fold technique (gently stretching and folding the dough over itself) every 30-60 minutes for the first 2 hours. This enhances gluten development.
- Use a well-floured banneton or a cloth-lined bowl for the final proofing. It prevents sticking and shapes the dough beautifully.
- Preheat your oven and baking vessel together (Dutch oven or combo cooker) for at least 20 minutes before baking to ensure a hot baking environment.
- Let your loaf cool completely on a wire rack before slicing. Cutting into the bread while it’s still warm can result in a gummy texture.
Sourdough Bread Variations
You can make several variations of this sourdough recipe with different kinds of flour like whole wheat flour, all-purpose Einkorn flour, spelt flour, rye flour, rice flour in combination with gluten-free flours, organic flour, and other kinds of whole grain flour.
Adjust the amount of flour that you use if changing from all-purpose, especially if you are using fresh ground grains. It should be 360 grams of flour.
Try this recipe for Jalapeno Cheddar Sourdough bread or with chopped dates for sweet date sourdough bread.
You can also add 1/2 cup of cocoa to your dough before mixing for a chocolate sourdough loaf. This sourdough bread can also be cooked a regular bread pan for soft sourdough sandwich bread.

I’d love to know what YOU think, please review the recipe card!

Fast Sourdough Bread Recipe – High Starter Method
Ingredients
- 2 cups Active Sourdough Starter (400 grams) active and bubbly, made from equal parts flour and water
- 3 cups Sifted All-Purpose Flour (360 grams)
- 1 cup Warm Water (240 grams)
- 1.5 teaspoons Salt (≈9 grams)
Instructions
- In a large mixing bowl (not metal) add 2 cups (400 grams) 100% hydration active sourdough starter. (For active starter, feed it and keep it OUT of the fridge for at least 4 hours, or overnight.)
- Add 1 cup warm water and whisk till well combined with the starter.
- Add: 3 cups sifted flour. (Sift or fluff your flour before measuring so it isn’t too compact in the measuring cup.) And 1.5 teaspoons salt. (I love to use Himalayan Pink Salt)
- Use a large spoon to mix ingredients together. It will be wet, biscuit-like dough.
- Cover this shaggy dough with a clean damp kitchen towel, and let the dough rest in a warm place for 2 hours. (Or in a warm oven (about 80 degrees) for about 1 hour)
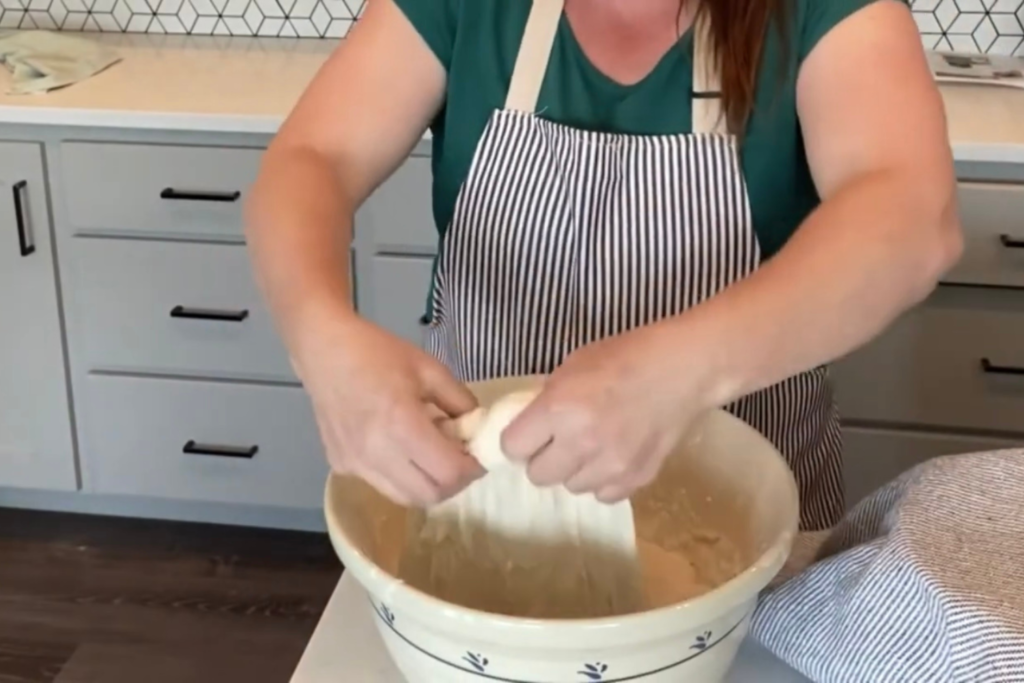
- First stretch and fold: After 2 hours of rising on your counter, uncover the dough, with wet hands pick up one side of the dough and fold it in half, over on top of the other side of the dough. Turn the bowl 90 degrees. Repeat 4-6 times by stretching and folding over all four sides of the dough, then rotating the bowl and repeating the stretch and folds on all sides. (The dough does not stick to wet hands as badly as dry hands.)Rise: Cover with a clean towel (or plastic wrap), and let the dough rise (about 45 minutes depending on the temperature of your kitchen) or till doubled again.
- Second stretch & fold: Uncover the dough, wet your hands, then pick up one side of the dough and fold it in half, over on top of the other side of the dough. Rotate bowl 90 degrees. Repeat 4-6 times by stretching and folding over all four sides of the dough. The dough is becoming more bread-like now!Rise: Cover with a clean towel, and let rise till doubled again.
- 3rd stretch and fold: Uncover the dough, wet your hands, then pick up one side of the dough and fold it in half, over on top of the other side of the dough. Rotate the dough 90 degrees. Repeat 4-6 times by stretching and folding over all four sides of the dough. The dough is even more smooth and bread-like now!Rise: Cover with a clean towel, and let rise till doubled again.
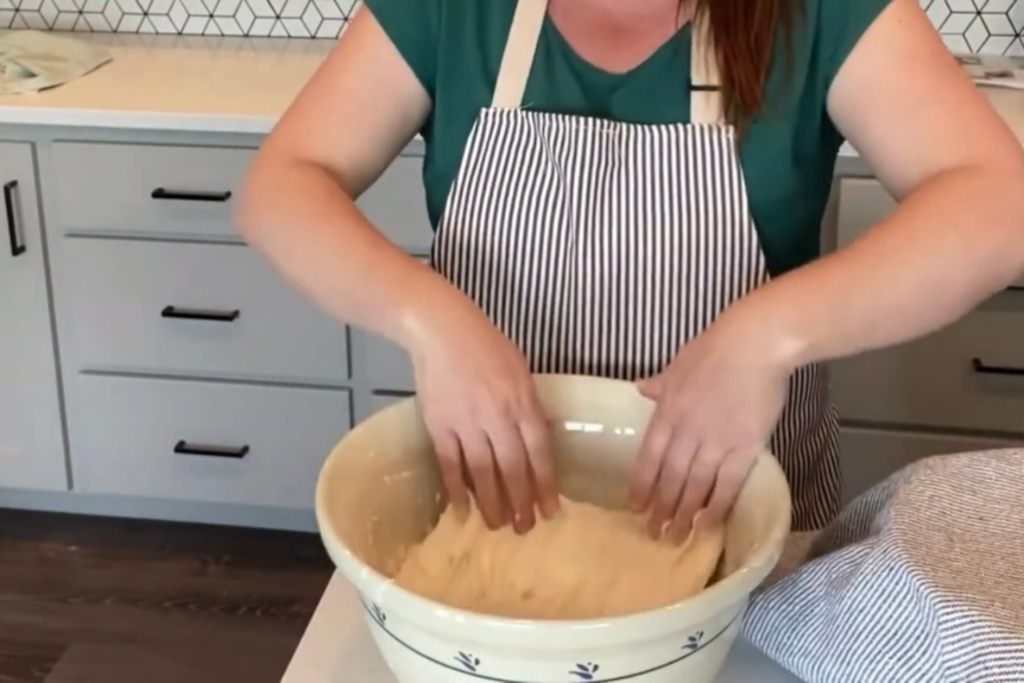
- 4th stretch and fold: Uncover the dough, wet your hands, then pick up one side of the dough and fold it in half, over on top of the other side of the dough. Turn the dough 90 degrees. Repeat stretch and folds 4-6 times by stretching and folding over all four sides of the dough, rotating the dough and doing it on all 4 sides each time. The dough is fluffy and bread-like now!
- After 4th stretch and fold, SHAPE YOUR DOUGH INTO A ROUND LOAF.
- Dust a towel, or proofing basket, generously with flour. And place shaped sourdough bread dough ball in it.
- Dust top of dough ball with flour, and cover the top with a clean towel.
- Refrigerate: Place the sourdough bread bowl into the refrigerator to chill and rise for 4 – 8 hours.
- Preheat Oven to 400 degrees F. and place your dutch oven into the oven to preheat too.
- Parchment paper: Cut a 2-foot section of parchment and place it on your counter.
- Gently turn out your chilled sourdough ball onto the parchment paper.
- Score: USE A VERY SHARP KNIFE OR RAZOR to SCORE A DESIGN INTO THE TOP OF YOUR DOUGH.
- Remove the hot dutch oven from your preheated oven.
- Place dough into the dutch oven: Lift the raw sourdough loaf into the dutch oven by the ends of the parchment paper. (It’s ok for parchment paper to hang over the sides of the dutch oven.) And put the lid on your dutch oven.
- Bake: Use hot pads or towels to put the hot dutch oven back into the preheated oven at 400 degrees. Bake covered for 25 minutes.
- Remove the dutch oven lid.
- Bake for 25 more minutes!
- Let cool and enjoy!
- Ask me any questions you have in the comments. And don't forget to rate this recipe card and let me know what you think!
Video
Notes
- 135 grams of your existing active starter (seed)
- 135 grams of flour
- 135 grams of water
Nutrition

About Juliea
Juliea is a mother of six, a sourdough baker, and a homestead builder living in Idaho. Alongside her husband and their horse, Dude, she manages a busy farmhouse and shares her love for scratch-cooking and simple homemaking. Through her blog and YouTube channel, she helps millions of families every year master the art of the handmade home.


48 comments
kathy lopez
hello, I am getting confused with the starter. I understand it’s 50 % water, 50 % flour, but when you say to feed our starter, do I add 50 % & 50 % flour again? If anyone can let me know I would appreciate it, thanks again for this recipe, can’t wait to try it.
Sincerely, Kathy
Juliea Huffaker
Hi Kathy! Yes, I feed my starter 50% flour and water by weight to get the right consistency. If that’s already how you do it, and you have enough, then you are ready to use it when it bubbles up.
Sharon
Turns out perfect every time! So yummy! Family hit!
Norma Kehley
Following your recipe I made my first successful loaf of sourdough bread!! Thank you! Is there a way to keep the bottom crust from getting so dark and tough? Otherwise it has a wonderful flavor and looks beautiful!!
Juliea Huffaker
Hello Norma! Yes you can place a pizza stone under your dutch oven to help prevent the bottom from over browning;) Hope that helps!
Nona
I am a beginner and I had tried two other recipes that were OK… But this one was the bomb!! wish I could show a picture! And when I cut into it, it was perfect and it tasted wonderful!
Dany
Hi, Juliea. My dough still seems pretty wet and sticky after 3d rise. Keep going and hope for the best or ? Also, could dough stay in the fridge overnight?
Juliea Huffaker
Hi Dany! It is a higher hydration dough, so it’s a little stickier…. Just wet your fingers when doing stretch and folds. And use flour to dust your counter when shaping your loaf. Your dough can stay in the fridge overnight, but because it’s a higher starter dough, it ferments faster, so don’t let it sit in there all day tomorrow… I bake it first thing in the morning! I hope this helps 😉
Sadie Huffaker
I could eat this all day! Nothing beats warm sour dough right out of the oven
Dixie Clements
This recipe is one of the easiest I have been to follow! The instructions are very thorough and the video helps a lot! It turned out perfect my first try!
Timber
I love this bread! It’s so moist and has an amazing flavor!!
Boden
Super yummy bread!
Tamara A.
Wow! This is the first time I have been able to successfully make sourdough bread. This step-by-step recipe is awesome. I’m making another loaf today!
Juliea Huffaker
That’s the best compliment.. So glad you enjoy it as much as I do!
Juliea Huffaker
Hi Selina! How are you preparing your sourdough starter? It may be too wet to start with. See above “I use ¾ cup all purpose or bread flour (100 grams) and ⅔ cup (100 grams) filtered water for this recipe. And you’ll need ⅔-3/4 cup active starter (100 grams). This should get you 2 cups of active bubbly starter at the right hydration so that the bread dough isn’t too sticky.” If this isnt the reason you may be in a very humid climate, or the temperature may be very warm and it’s fermenting super fast?
Selina
How do I stop it from fermenting so fast then? Because I have a 1:1:1 starter by weight.
Juliea Huffaker
Don’t put it in a warm spot to bulk ferment between stretch and folds if it’s fermenting too fast… You can refrigerate to retard the fermentation process… Or if you have a cooler spot for the bulk ferment;)
Judith
I’ve tried enough sourdough recipes but I find so many of them are a little “extra” than I’d want. I’ve been looking for a simple, no-nonsense and delicious sourdough loaf recipe and this recipe is it.
Juliea Huffaker
It may be the starter… This is how I make my 2 cups of active starter (if it’s too wet the dough will be too sticky) FIRST PREP YOUR STARTER – LEVAIN
Early in the morning prep your starter by creating a batch of levain, the active portion of your sourdough starter, using a 1:1:1 ratio by weight with your established starter. This recipe will yield at least 2 cups (480 ml) of levain.
Ingredients:
– Existing sourdough starter (active and bubbly): 100 grams – ⅔ cup (120 grams) to ¾ cup (180 ml). The starter’s consistency can affect the amount in a cup. Err on the side of less starter at first… You can always add a bit more if the levain seems too dry after mixing;)
– All-purpose flour: 100 grams – ¾ cup (120 grams). This is a slightly rounded amount to account for the packing density of flour. Scooping flour can compress it, leading to less flour than intended. Sifting the flour can help get closer to 100 grams.
– Water: 100 grams – ⅔ cup (180 ml).
Measure your ingredients: If you don’t have a scale, discard any hooch from your starter and then scoop out what appears to be 100 grams. Weigh out 100 grams each of all-purpose flour and water.
Combine ingredients: In your clean glass jar, whisk together the starter, flour, and water until a thick batter forms. There should be no dry flour streaks.
Cover and store: Loosely cover the jar with a lid or cloth to allow some airflow. Store your levain at room temperature (around 70-78°F / 21-26°C).
Over the next few hours, your levain should become quite active, showing significant bubbles and roughly doubling in size. This typically takes 4-8 hours, depending on your starter’s health and temperature.
Target Levain Ripeness: Ideally, your levain should be at its peak ripeness when it reaches its maximum volume and starts to show signs of doming or collapsing slightly in the center. This indicates the levain has used most of the available sugars and is ready to contribute leavening power to your dough. It should double or triple in height!
Juliea Huffaker
Hi Julie! You can rise and bake after the 4th stretch and fold! It’s just not as fermented… But I’ve done that and it’s still wonderful sourdough bread!
Juliea Huffaker
Hi Alexis.. Just measure out the active starter for the recipe… Then add equal parts flour and water to your starter jar. With just a bit of leftover starter on the jar it will be enough to make a new batch;)
Darin
Crusty outside and chewy inside. This sourdough bread is so good!
Darin
Delicious sourdough bread! I love when my wife makes this recipe!
Juliea Huffaker
Hi Pat! No.. This does not replace the stretch and folds… Some people like to mix the individual ingredients together the first time with an electric mixer and dough hook… I do not. I just stir together till combined with a rubber spatula;)
Juliea Huffaker
Hi Lauren! The rising time really depends on the temperature of your home, or rising spot. I give it an hour or two before the first stretch and folds, then 30-45 minutes till it has risen again, then my second stretch and folds, and repeat letting it rise 30-45 minutes between or till you can see that it has risen well 😉
Juliea Huffaker
Hi Rebecca.. That’s awesome that your oven has a proofing function! Yes you can speed up the process by putting it in the warm oven (assuming its about 80-90 degrees?) Just keep an eye on it as you’ll do stretch and folds closer together;) That should cut down on your proofing time a lot!
Juliea Huffaker
Yea… I’m so glad you love this recipe Rose! Yes I’d bake for 15-20 minutes with and then 15-20 minutes without the lid… Till Golden, but not brown.
Juliea Huffaker
Hi Barbara! I always flour my towel or banneton basket liner really well before the final shaping and refrigerating over night. Sounds like it stuck to the towel, because it didn’t have enough flour on it. Or, it stayed in the fridge too long and over fermented? These are just guesses… This recipe ferments faster than most because it has more starter in it, so I always back my sourdough bread early the next day;)
London Goodnight
Baked a loaf today and it’s great!
What are is the nutritional value?
Juliea Huffaker
Hi London… Yea! So glad it turned out great! I’m adding the nutritional value to the recipe card now!
Juliea Huffaker
For 10 servings it’s 2223 calories. 7 grams protein, 47 carbs, 3 grams fiber…. My family eats about a 10th of the loaf each… But you can break it down from there for more servings! Hope this helps!
Juliea Huffaker
Hi Lori! This recipe calls for a lot more starter than most… But it turns out delicious and beautiful. It adds extra moisture making it a higher hydration loaf, but more of the flour in the recipe is pre-fermented, so it ferments f aster too. It’s 2 cups of active starter…. I weighed it to get an exact amount for those who want it. But usually I just measure out 2 cups of active starter;)
darin
we love this recipe and make it weekly
Maddy
My dough doesn’t look like it’s rising or not at least that I can tell. How do you know if it’s risen correctly?
Juliea Huffaker
If your bread is rising you will see that it has grown or doubled in size… But sourdough takes a lot longer than commercial yeast to rise. It can take 4 hours for your dough to double in size at room temperature;)
Olivia Hardin
Is the dough supposed to change?? I don’t see mine really doubling in size after each fold and it’s pretty jiggly and sticky still
Juliea Huffaker
Hello Olivia! Your dough will be rising slowly. If it’s too sticky, just run your hands under cold water and then do stretch and folds… this helps the dough not to stick to your hands. Let your dough rise between stretch and folds. The gluten develops during the rising and stretch and folds and makes it a beautiful dough. If you let it rise in a warm place it helps speed up the process! I hope this answers your questions… If you have more, don’t hesitate to ask!
Meagan
This was my first attempt at sourdough bread. Even though I realized a few things I should have done a little differently, I still came out with an amazing result! Thank you for the extra details. It really helps beginners like me!
Darling
This sourdough bread recipe is different from most as it uses more starter…. But it can be made all in one day as it ferments faster! The crumb is perfect, and we love it!
Jane Fagan
I have a couple , three or four questions regarding your sour dough starter.
I mixed up the flour & potatowater on Monday On Tuesday it looked like it was doing good on Tuesday I added more flour & potato water, mixed it a couple times thar day. Your instructions did nt tell me to discard ant. On Wed, the flour & water separated but you could see where it rose then fell . I continued following your instructuns.. This morning it was worse. It did not rise & fall . Am I suppose to be discarding 3/4 of the flour mixture daily?
juliea
Hi Jane! Yes you do need to discard down to the original measurements (I use 2 cups, you can also use 2 tablespoons) while making the starter…otherwise you’ll have to feed it too much everyday.
Janet Catacutan
I was able to find good information to start my sourdough from your articles.
kelly
I’m finding that after about 4 days of adding flour and water, when I added flour and water it just kind of goes flat….I didn’t add flour and water one day, and now it’s good and bubbly again? Is it ready to use? It’s been 6 days today…and I just yesterday was first day I quite adding water and flour. IS it ready to go? And, just so I’m interpreting the bread making right…the 50% hyrdrated starter is hydrated because i put it in the fridge for 4 hours to overnight? Also, on the stretch and folds…is it four times per all four sides or four times total? Just don’t want to overdo it 🙂
juliea
Hi Kelly! Yes if your starter is bubbly it’s good to use! I just stretch and fold 4 times. Then let it rise again and repeat.
50% hydration on the starter just means your starter is half water and half flour.
Julia
Wow! This is so comprehensive. Thank you for sharing all of these details. I wonder if I can do something like this with glueten free flour?
juliea
Hi Julia! Thanks for your comment! I’m not sure that gluten free flour would hold together as well. It would probably work but be a little less chewy inside, and might not rise as much with a gluten free flour. Let me know how it goes, I’d love to know!
Dani
Can’t wait to try this recipe!
juliea
Thanks Dani! It’s super easy, and delicious! Enjoy!