


It’s easier than you think! This simple Sourdough Bread recipe is designed to be your first step into the world of naturally leavened loaves.
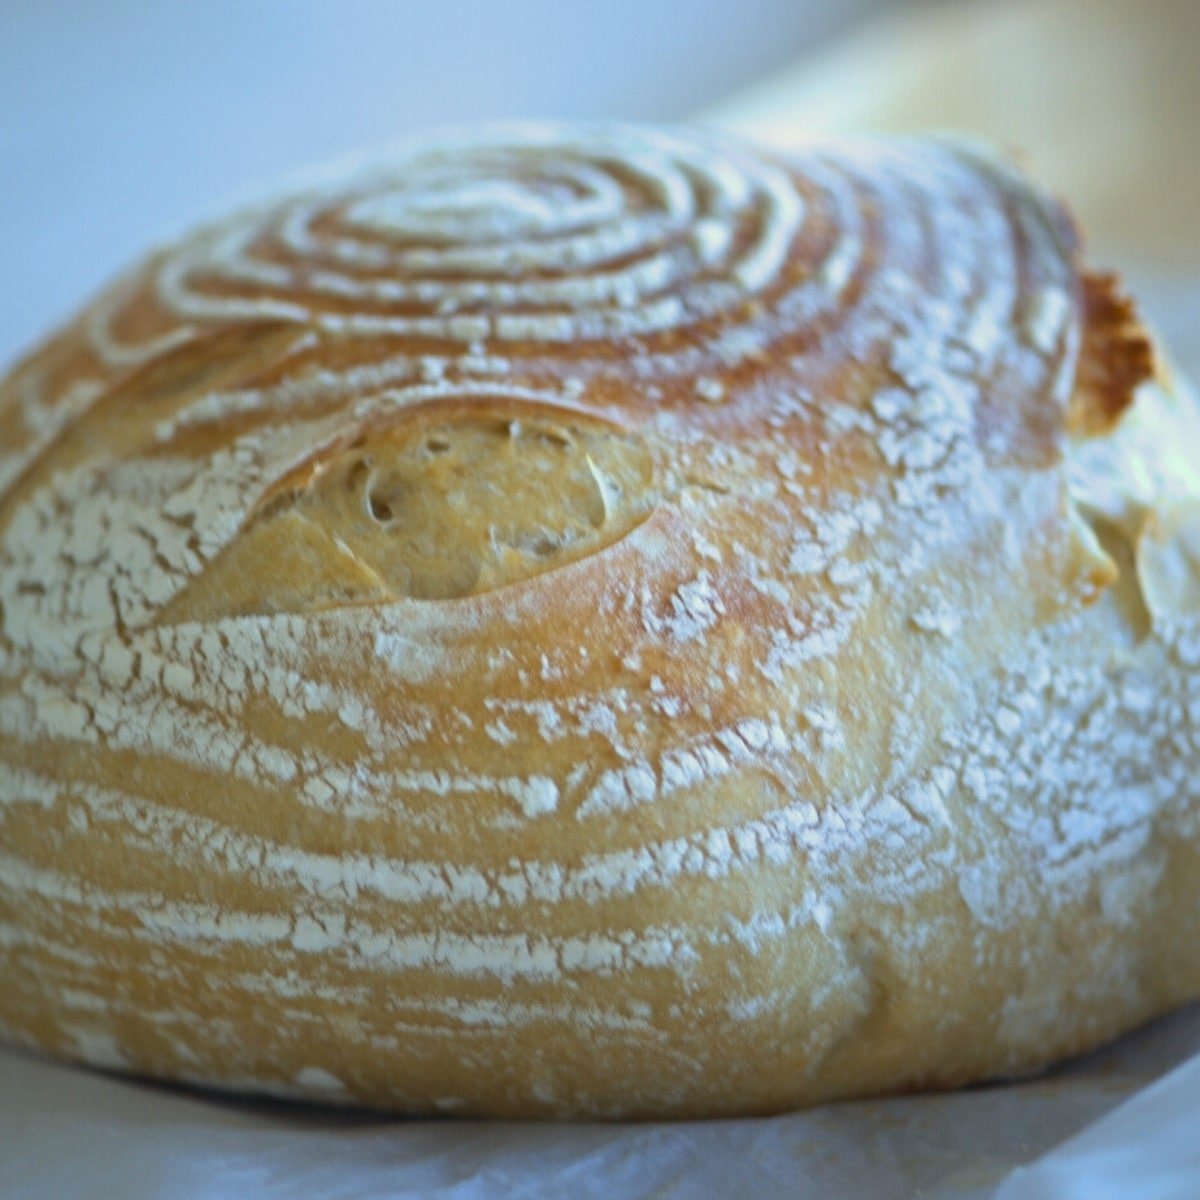
Get ready for that satisfying crispy crust with delightful chewiness inside, and flavor that’ll make you forget store-bought! I’ll show you how to make sourdough bread even easier and with a more developed flavor than you might think.
It might take a try or two to get it just perfect, but trust me, the journey is totally worth it. Don’t hesitate to ask any questions in the comments below, and please let me know how your baking goes!

The Sourdough Starting Point
Most sourdough recipes use a tiny bit of sourdough starter. We’re keeping it simple and manageable with a half cup! Why? Using a half cup of starter helps our dough rise more predictably. For this revised recipe, using a half cup of starter slows down the process, which is actually a trade secret for developing a deeper, tangier sourdough flavor…. That means you’ll be enjoying your very own homemade sourdough with an incredible taste!
Simple Ingredients
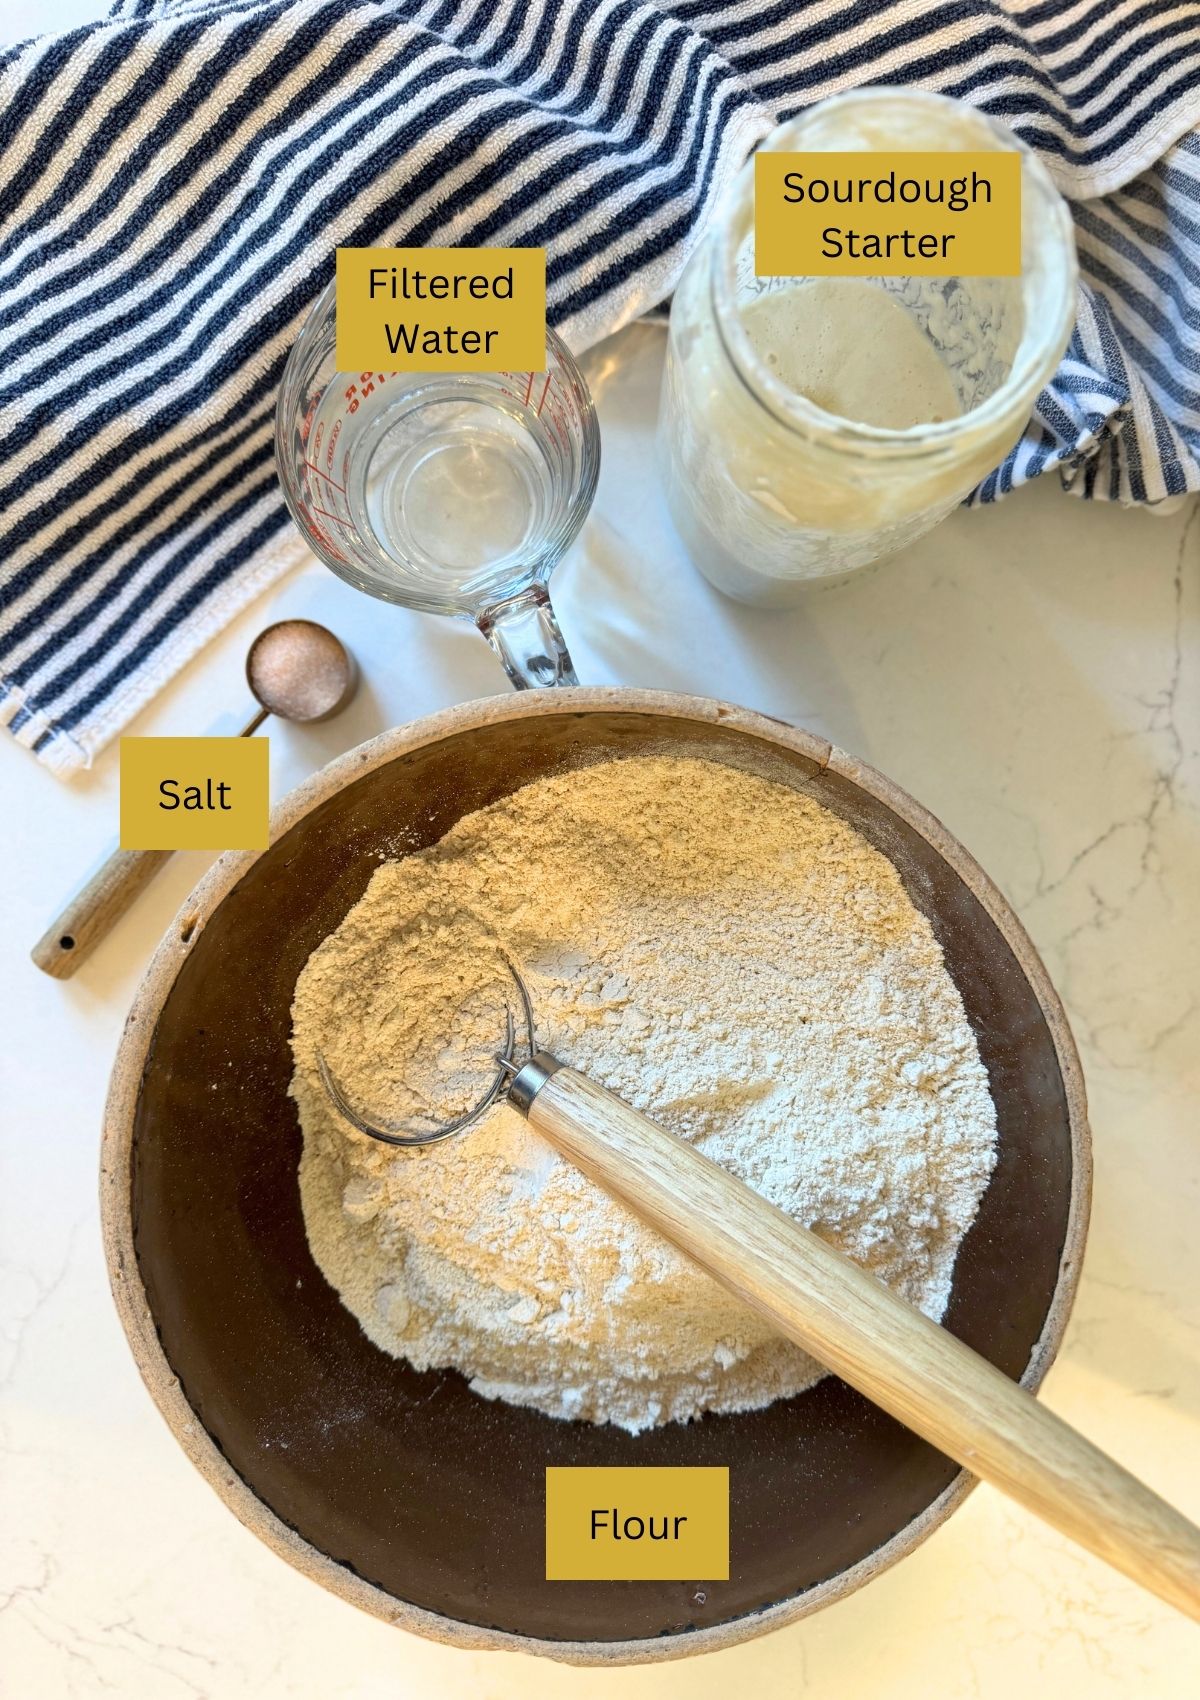
You don’t need a pantry full of exotic flours for this. We’re keeping it basic but beautiful:
- Sourdough Starter: This is the heart and soul! It’s your natural yeast that makes the magic happen. Remember, we’re talking about a 100% hydration starter – that means it’s equal parts water and flour by weight. Think of it like a bubbly, active science experiment that smells a little tangy.
- Sifted All-Purpose Flour: Yep, good old all-purpose works great to get you started. You can totally experiment with bread flour or even a touch of whole wheat down the line, but let’s nail the basics first. Pro Tip for Beginners: Sifting helps get rid of any lumps and makes the flour a bit lighter, which can lead to a fluffier dough. Just a quick whisking works too if you don’t have a sifter!
- Filtered Warm Water: Warmth is our friend here! It helps wake up the yeast in the starter and gets things moving. Avoid super hot water, though – you don’t want to shock those little guys.
- Salt: Don’t underestimate salt! It not only adds flavor but also helps control the yeast activity and strengthens the dough.
- Fold in options: Chopped Cranberries, chopped dates, sliced jalapeno and cheddar!

Tools (Keep it Simple!)
You don’t need a fancy bakery setup to make amazing sourdough. Here are the basics I use, and what you can totally work around as a beginner:
- A Big Ol’ Mixing Bowl (Non-Metal is Best): Plastic or glass is perfect. Metal can sometimes react with the sourdough.
- A Bench Scraper (Your Dough’s Best Friend): This handy tool helps you wrangle sticky dough and keeps your counter (mostly) clean. Beginner Insight: If you don’t have one, a sturdy spatula or even a butter knife can work in a pinch!
- Dutch Oven with a Lid (The Secret Weapon): Seriously, this makes a HUGE difference. The lid traps steam, creating a mini-oven inside that helps your bread get that incredible rise and crispy crust. Pro Tip: If you don’t have a Dutch oven yet, you can bake on a baking sheet, but the results won’t be quite as dramatic. You can try placing a tray of water in the bottom of your oven to create some steam. I use a 4.5 and a 5.5 qt. dutch oven. If you only have a 3 qt dutch oven, you can split this batch in half for 2 smaller loaves!
- Parchment Paper (Makes Life Easier): This isn’t essential, but it makes transferring the dough to the hot Dutch oven a breeze and prevents sticking.
- Proofing Basket (or a Cozy Towel-Lined Bowl): These baskets (bannetons) give your loaf those pretty spiral patterns. But hey, a regular bowl lined with a well-floured kitchen towel works just as well for shaping!
- A Clean Kitchen Towel: To cover your rising dough.
- A Wooden Spoon or Danish Whisk: For mixing. Your hands work too!
- A Sharp Knife or Razor Blade: For scoring the top of your loaf. This helps it expand in a controlled way.
And don’t even worry about a kitchen scale if you don’t have one! This recipe is designed to work with cup measurements, though I’ve included the weights in the recipe card if you ever decide to go that route for more precision.
Sourdough Starter
Think of your sourdough starter as a living thing! It’s a colony of wild yeasts and bacteria that you cultivate with flour and water. It takes a little time to get one going from scratch (and you can find my recipe to make your own here).
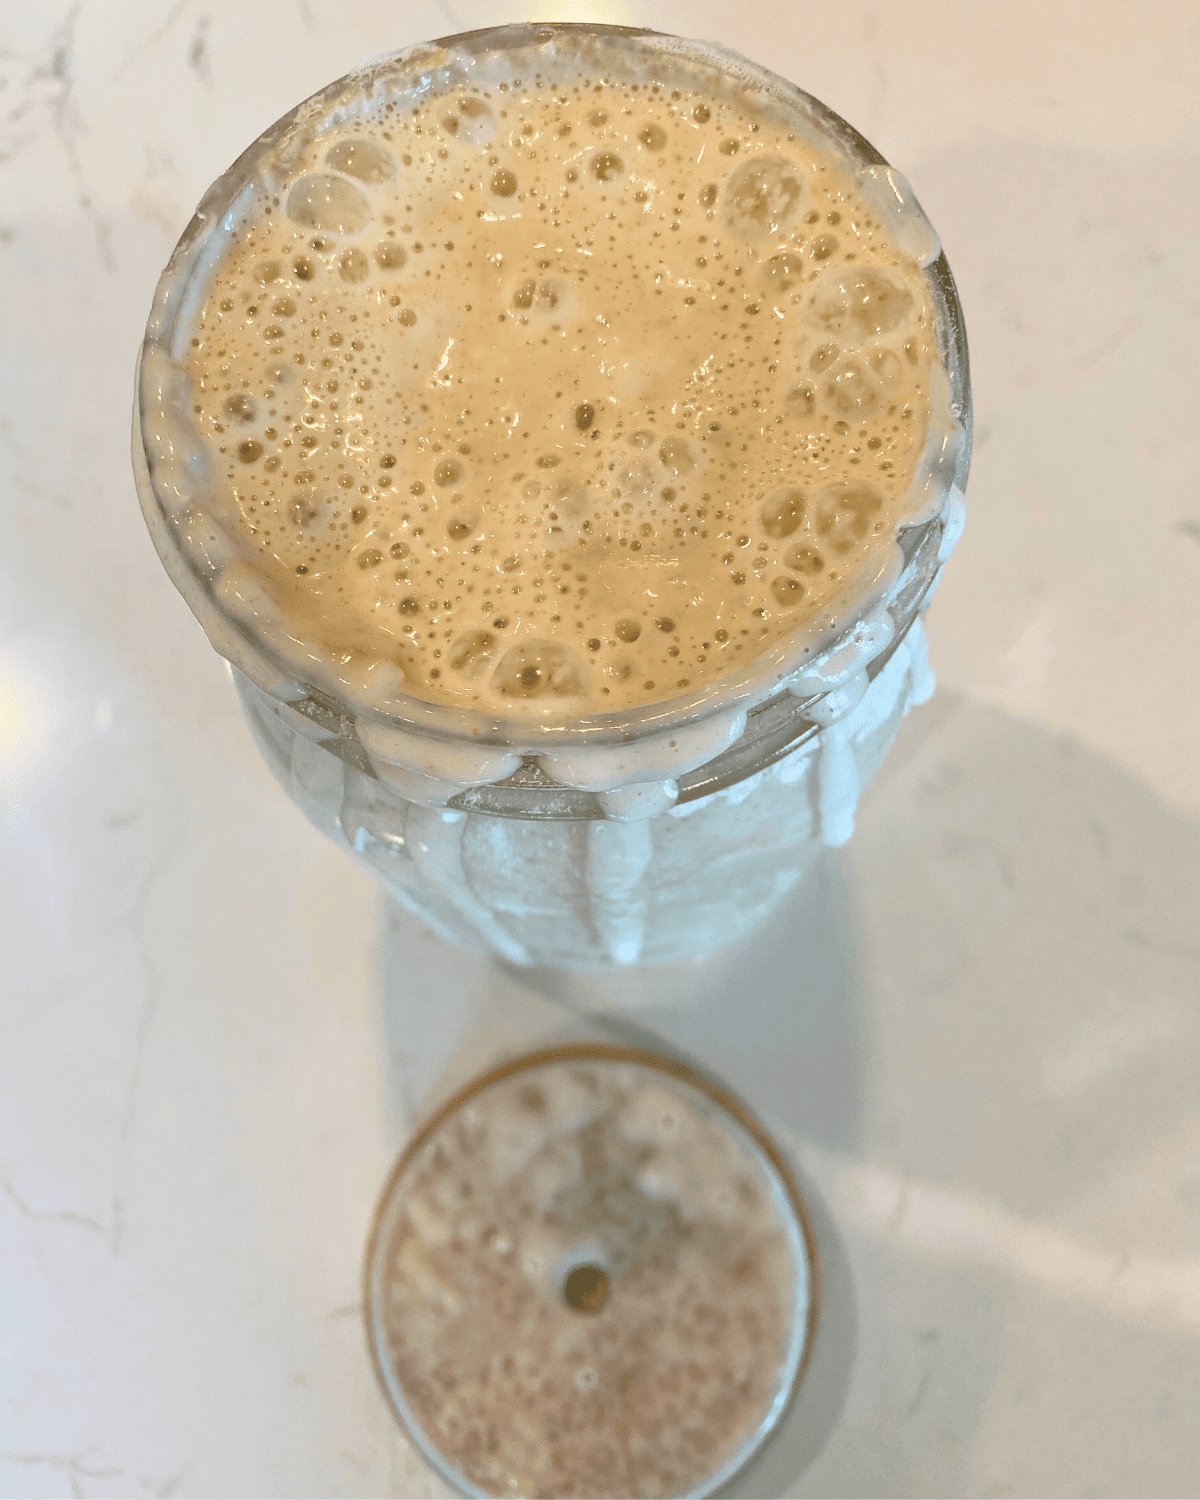
For this recipe, you’ll need an active starter. What does that mean? It means it’s been fed recently and is nice and bubbly, usually having doubled (or even tripled!) in size after a feeding. If your starter lives in the fridge (like most of ours do!), you’ll need to wake it up.
How to Get Your Starter Ready:
- Take it out of the fridge: Give it a few hours at room temperature to get going.
- Feed it equal parts flour and water!
- Let it sit at room temperature until it’s doubled and bubbly – this might take anywhere from 4 to 14 hours depending on how active your starter is and the temperature of your kitchen.
You’re looking for lots of bubbles and a starter that has at least doubled in size. It should have a slightly tangy, yeasty smell. Once your starter is active and happy, you’re ready to bake!

Tips and Tricks for Sourdough Success
Baking sourdough is a journey, and a little insight can make a big difference. Here are a few secrets to getting that perfect loaf every time:
Patience is the Secret Ingredient (Listen to Your Dough): Since we reduced the amount of starter, your bulk fermentation (the main rise) will take significantly longer. Ignore the clock and look for visual cues: your dough should increase in volume by 30-50% and feel light and airy. This slow, cool rise is how you develop that famous tangy sourdough flavor!
The Power of Warmth: Sourdough loves warmth for rising. If your kitchen is chilly, find a slightly warmer spot for your dough to hang out. A great trick is to preheat your oven to 180∘F for a few minutes, then turn it off! This is a great, warm spot to help your dough rise.
The Cold Proof is Essential: Don’t skip the final cold proof in the fridge! This isn’t just for flavor—it firms up the dough, making it much easier to handle, shape, and score the next day. A cold dough holds its shape better when it hits the hot Dutch oven.
Don’t Cut Too Soon! This is the hardest part. The internal structure of your bread is still setting after baking. Cutting into a warm loaf will give you a gummy texture. Resist the urge and let it cool completely (usually 1-2 hours) on a wire rack before slicing.

Stretch and Folds (Your Gentle Workout)
This is our no-knead “kneading” technique, which develops the dough’s strength and gluten without heavy labor.
First Stretch & Fold: After the 2-hour rest, uncover the dough. Wet your hands (this prevents sticking!). Gently grab one side of the dough, stretch it upwards, and fold it over the top of the dough. Turn the bowl 90 degrees and repeat this 4-6 times until you’ve worked your way around the entire dough.
First Rise/Rest: Cover the bowl again and let it rest for about 45 minutes to an hour, or until it looks like it has puffed up a bit. The exact time will depend on the temperature of your kitchen. Warmer = faster rise.
Repeat Three More Times: Repeat the stretch and fold process (wet hands each time!) three more times, with a 45-minute to 1-hour rest in between each set. You’ll notice the dough becoming smoother and more elastic with each set of folds.

Shape It Up: After the final stretch and fold and rise, gently turn your dough out onto a lightly floured work surface. Shape it into a round loaf (boule) by gently tucking the edges underneath to create some surface tension.

After cooling, slice and serve with Zuppa Toscana Soup, or us it to make Chicken Salad sandwiches!
Cooling & Storing Sourdough Loaves
If you have any leftovers (lucky you!), store your sourdough bread in an airtight container, cloth bag, or zip-top bag at room temperature for up to 3-4 days. Toast it for amazing sandwiches, or even turn it into croutons!
Please let me know what YOU think with a review!
Simple Sourdough Bread Recipe for Beginners
Ingredients
- 100 grams sourdough starter – (about 1/2 a cup) 100% hydration active bubbly starter.
- 450 grams bread flour (3 1/2 – 3 2/3 cups) sifted, or bread flour. Note: If using a stand mixer, the dough may look wetter than it is. Resist the urge to dump in extra flour right away! Give it 3–4 minutes to mix first, then add just a tablespoon at a time only if needed to help it pull away from the sides.
- 360 grams warm water – (about 1 1/2 cup) about 80-90°F / 27-32°C
- 9 grams salt (about 1 1/2 teaspoons) 9 grams
Instructions
- Combine: In a large mixing bowl (non-metal), combine the active sourdough starter and warm water. Whisk until mostly combined.
- Mix: Add the flour and salt to the bowl. If mixing by hand: Use a large spoon to mix until a shaggy dough forms. If using a stand mixer: Mix on low with a dough hook for 4–5 minutes until cohesive. (Note: If you use a mixer here, your gluten is already well-developed, so you only need 2 sets of stretch-and-folds later instead of 4!)
- Rest (autolyse): Cover the bowl with a damp kitchen towel and let it rest in a warm place for 2 hours.
- First Stretch & Fold: Uncover the dough, wet your hands, grab one side of the dough, stretch it upwards, and fold it over the center. Rotate the bowl 90 degrees and repeat this 4-6 times.
- Rest: Cover the bowl and let the dough rise for 1 hour, or until it has visibly puffed up.
- 3 more sets of Stretch and folds: Repeat the stretch and fold process three more times, with a 1-hour rest in between each set. If You are using a stand mixer, just do 1 more set of stretch and folds. 😉
- Bulk Ferment & Shape: After the final set of folds, cover the dough and let it rest until it has visibly increased by 30-50% in volume (this could take 1-4 hours depending on your kitchen temperature). Then, gently turn the dough out onto a lightly floured surface and shape it into a round loaf.
- Refrigerate: Generously dust a kitchen towel or proofing basket with flour. Place the shaped dough seam-side up in the towel or basket. Dust the top with flour and cover tightly. Place the bowl or basket in the refrigerator for at least 4 hours, and up to 24 hours.
- Preheat your oven to 425°F (200°C) with your Dutch oven (lid on) inside for at least 30 minutes.
- Score: Gently invert the dough onto a piece of parchment paper. Use a sharp knife or razor blade to score the top of the dough.
- Bake: Carefully lift the dough (using the parchment paper) into the hot Dutch oven. Cover with the lid. Bake for 25 minutes with the lid on. Remove the lid and lower the temperature to 400°F and bake for another 25 minutes, or until the crust is golden brown and the internal temperature reaches around 200°F (93-99°C).
- Cool: Carefully remove the bread from the oven and Dutch oven. Let it cool completely on a wire rack before slicing and enjoying.
Notes
- Active Starter: For this recipe, you’ll need 1/2 cup of active and bubbly 100% hydration sourdough starter. 100% hydration just means it’s made of equal parts of flour and water by weight.
- I recommend getting a kitchen scale for best results.
- Flour sack towels don’t stick to the dough while it’s fermenting, proofing and resting.
- I love to use pink Himalayan salt or sea salt in this recipe.
- Warm Place for Rising: A slightly warm (but not hot!) environment helps the dough rise faster. You can use a turned-off oven with the light on, or a warm spot in your kitchen.
- Timeline: Don’t let the total time scare you! Your actual hands-on work for this bread is only about 20 minutes. The rest of the time is completely hands-off: 4 hours of resting/folding on your counter, followed by a long, slow 10+ hour sleep in the refrigerator. This cold ferment is what builds that incredible, classic sourdough flavor while you sleep!
Nutrition

About Juliea
Juliea is a mother of six, a sourdough baker, and a homestead builder living in Idaho. Alongside her husband and their horse, Dude, she manages a busy farmhouse and shares her love for scratch-cooking and simple homemaking. Through her blog and YouTube channel, she helps millions of families every year master the art of the handmade home.


10 comments
Taylor
If you wanted to add flavors or ingredients to this recipe at what point do you recommend doing that?
Juliea Huffaker
Hi Taylor, The best time for inclusions is the “lamination” stage… For the most beautiful distribution of flavors, add your ingredients during the second set of stretch and folds. Why then? At this point, the dough has rested and the gluten is starting to develop, but it’s still flexible enough to “trap” the ingredients inside the layers. This is how I do it: Spread your dough out slightly in the bowl or on a dusted surface, sprinkle about a third of your inclusions over the top, and then perform your stretch and fold. Repeat this for the next couple of folds until everything is evenly incorporated. I hope this helps!
Sonja
I absolutely love this recipe. I’m new to sourdough and was very nervous making my first loaf. It came out amazing! I would love to gift these in a basket or Christmas. I’m hoping to split the dough in half to make two loaves. Do you know how or if I would need to adjust the baking time?
Juliea Huffaker
Great to hear Sonja! You would first Bake with the Lid On (The Steam Phase): Keep the lid on for 20–25 minutes. You still need that initial blast of steam to get a great “oven spring” and that beautiful crackly crust. Even for a smaller loaf, this timing stays pretty similar to a big one.
The take the Lid Off (The Browning Phase): This is where the biggest change happens! A smaller loaf has less surface area, so it browns much faster. Check it after 10–15 minutes. You’re looking for that deep, golden-brown color we all love.
For 30–40 minutes total, compared to the 50+ minutes for a full loaf.
Birthe
What size Dutch oven do you use? Is a 3.2 quart big enough?
Juliea Huffaker
Hi Birthe! I use a 4.5 or a 5.5 qt dutch oven work best for most sourdough bread recipes…. But, if yours is to small, you could always cut the batch in half and bake 2 smaller loaves with a 3.2 qt dutch oven!
Tricia
I .made a starter from Gh
cookbook. I used a packet of red star yeast with water and flour. After 3 days I refrigerator the starter as recipe said. I used one cup of starter for the bread. I didn’t have a crock pot…so I used a pan. 400 degrees and 35 minutes. The bread was very hard but,soft inside. The texture was like French bread. It never seem to have the wonderful bread smell. I’m wondering if I can used a porcelain covered dish to bake in ? The starter sat at room temperature maybe 30 minutes before putting it in the bowl. The starter was maybe 7 days old but, it was never fed.. it had bubbles in it. I stirred it several times a day. . .. after taking the cup of starter, I replaced it with a 1/4 cup of flour and a 1/ 4 cup water… as in the recipe. I’ve been researching sourdough recipes and starters… to figure out what I did wrong, because I followed the recipe. I came across your page. Hopefully I can make a wonderful sourdough bread.
Juliea Huffaker
Hi Tricia! I’m so glad you found your way to my page. First of all, don’t be discouraged! Sourdough is a journey, and almost every baker has a “brick” or two in their past before they nail that perfect loaf. It sounds like you have a great head start with your equipment, but there are a few “science” things happening with your starter that likely caused the hard crust and lack of aroma.
Here is what I think happened and how we can get you that “wonderful bread smell” next time:
1. The Starter vs. The Yeast
It sounds like you started a “yeast starter” (since it used a packet of Red Star) rather than a wild sourdough starter. While both make bread, a true sourdough depends on wild yeast and bacteria that develop over time without the packet. Because yours wasn’t “fed” for 7 days, the yeast likely ran out of food and became weak. When the yeast is tired, the bread doesn’t rise well, which can lead to that very hard, dense crust.
The Fix: Before you bake, you want your starter to be “active and bubbly.” Since yours is in the fridge, take it out the day before and feed it equal parts flour and water. Wait until it doubles in size and looks like a bubbly science experiment before you put it in your dough!
2. The “30 Minute” Wake-up
You mentioned the starter only sat out for 30 minutes. Sourdough likes to be nice and warm to “wake up.” If the starter is cold from the fridge, it will act very slowly. Next time, give it 4–14 hours at room temperature after a feeding until it’s nice and active before mixing your dough.
3. Baking in a Porcelain Dish
Yes! You absolutely can use a porcelain-covered dish (like an enameled Dutch oven). In fact, I highly recommend it! Using a covered dish traps the steam inside, which keeps the crust from getting too hard too fast. This allows the bread to expand (the “oven spring”) before the crust sets.
4. Why the French Bread Texture?
Without that long “Bulk Fermentation” (the slow rise) I talk about in my recipe, the bread won’t develop those tiny air bubbles and that signature sourdough tang. Sourdough needs patience—it’s all about the slow rise to get that amazing aroma!
My Suggestion: Try my recipe using 1 cup of your starter, but make sure to feed your starter the night before so it’s happy and bubbly. Follow the “Stretch and Fold” steps—this is the secret to getting that chewy, soft inside without the French bread denseness.
You are so close! Keep at it, and don’t hesitate to ask more questions. I can’t wait to hear how your next loaf turns out!
Dixie
This recipe was so easy for my first time!! It turned out great! The dough was super easy to handle!
Timber
I am new to sourdough and I love this recipe. It’s super easy to follow and gives great bread.