These irresistible chewy sourdough ciabatta rolls have a golden crust, chewy crust, and that tangy sourdough flavor!
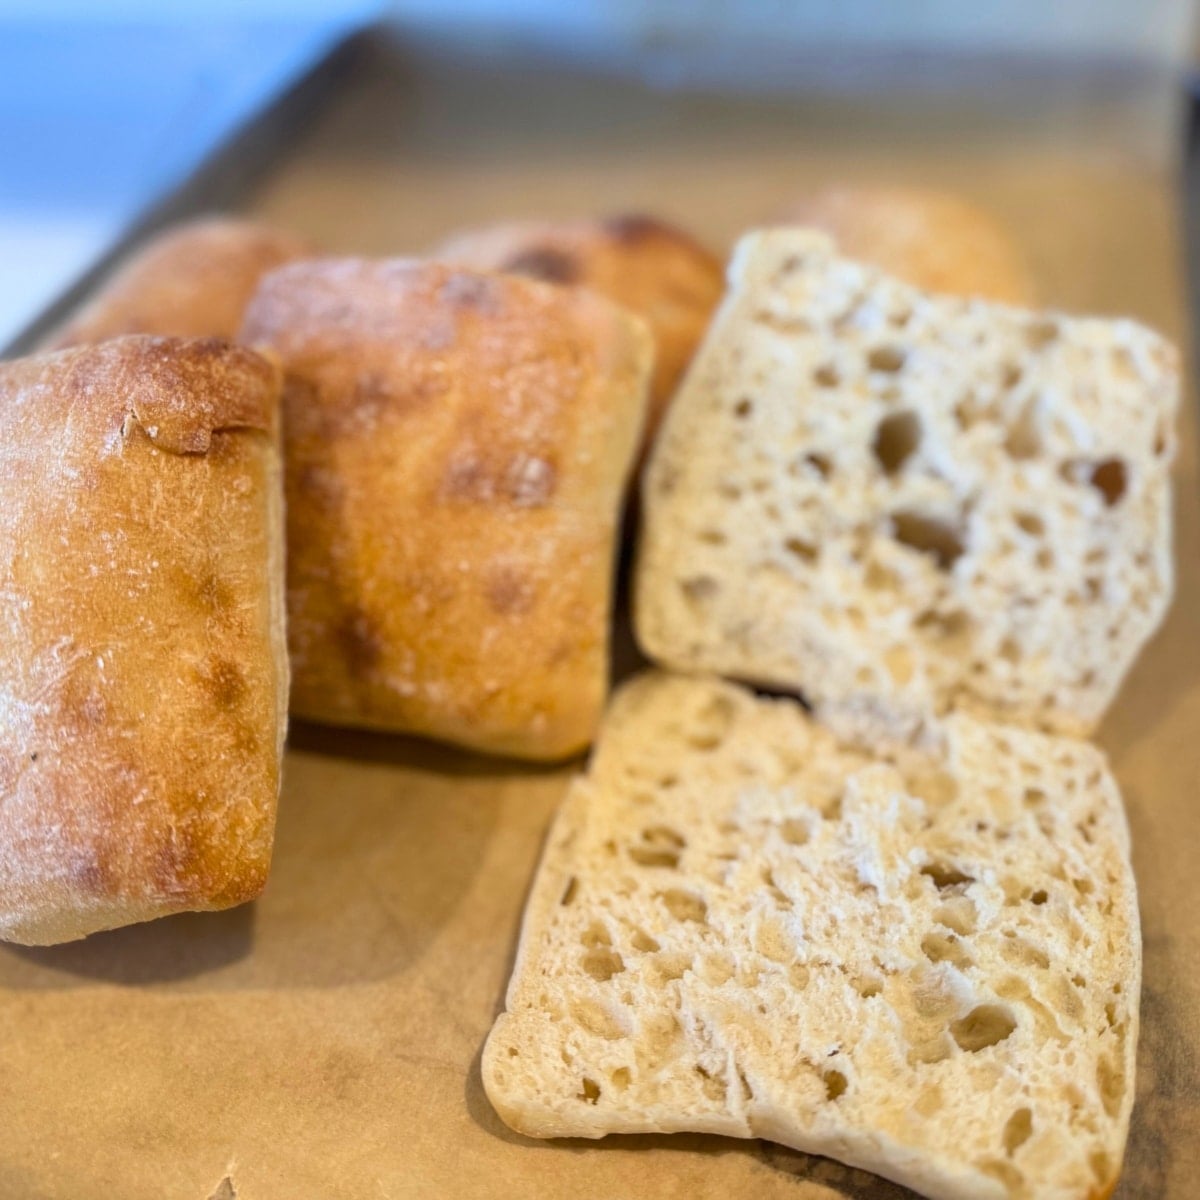
Everyone loves simple sourdough ciabatta rolls! Made with a little extra love and a long fermentation for sourdough flavor!
This recipe makes about 12 sourdough ciabatta rolls, depending on how large you shape them… And they make the best roast beef sandwiches!

Recipe Tools
- Large mixing bowl
- Kitchen scale (or measuring cups and spoons). Weight measurements are more accurate than cups, so use a kitchen scale, if you can, for the best results.
- Bench scraper
- Plastic wrap or a damp kitchen towel
- Baking sheet
- Parchment paper (optional)
A bench scraper is a great tool when working with bread dough… It helps you easily divide the dough, lift and transfer it, and scrape up any sticky bits left on your counter!


Stretch & Folds
This recipe uses stretches and folds to develop the gluten in the dough and create a more elastic dough and structured crumb.
Gluten is a protein that gives bread its characteristic chewy texture and helps it hold its shape. When you mix flour and water, gluten begins to form, but it needs to be stretched and folded repeatedly to develop properly. This is where the stretches and folds come in.
Each set of stretches and folds involves pulling and stretching one side of the dough up and then folding it back onto itself. Then you turn the dough 90 degrees and do it again. Repeat on all 4 sides of the dough. This helps to align the gluten strands and develop a more organized structure. As you repeat this process, the dough becomes more elastic and easier to handle.

Sourdough Starter Hydration
I use the same sourdough starter hydration for all my recipes (like my sourdough bread for beginners). For this long fermented Sourdough Ciabatta Roll Recipe, the sourdough starter should have a hydration of 100%, which means it is equal parts flour and water by weight.
So if you’re feeding your starter with equal parts flour and water by weight, you’re good to go. If your starter is at a different hydration level, you may need to adjust the amount of water or flour in the recipe to get the right consistency.

Why wait to add salt!
The reason for waiting to add salt until after the initial 12-hour bulk fermentation is to give the yeast and bacteria in the sourdough starter time to break down the flour and develop the gluten. Adding salt too early makes it harder for the dough to rise.
By waiting to add salt until after the bulk fermentation, you allow the dough to become more extensible and easier to work with.

How to Shape Ciabatta Rolls
Divide the dough: Divide the dough into equal portions for your desired number of rolls. Then Gently shape: On a lightly flour your work surface, gently fold the dough over on itself a few times to create a rough rectangle… Avoid excessive kneading or shaping, it will deflate the dough;)
Serving Sourdough Ciabatta Rolls
The airy, chewy texture of ciabatta rolls makes them the perfect bread for sandwiches. Slice them in half and fill them with your favorite meats, cheeses, and veggies for a satisfying lunch or dinner!
Ciabatta rolls are also great for grilling or toasting… They make great paninis or grilled cheese sandwiches!

Recipe Tips
- Use a kitchen scale: It’s important to use a kitchen scale, if you can, to measure your ingredients.
- Bulk fermentation: The longer you allow the dough to ferment, the more flavor and texture it will develop. Don’t rush the process – give the dough plenty of time to rest and rise.
- Shaping: Ciabatta dough is wet and sticky, so handle it gently when shaping the rolls… Try to avoid adding too much extra flour;)
- Use a baking stone or steel: For best results, bake the rolls on a preheated baking stone. This makes a crispy crust and helps rolls bake evenly.
- Storage: To keep the rolls fresh, store them in an airtight container at room temperature for 2-3 days. (You can also freeze them for longer storage.)
Recipe Card
Chewy Sourdough Ciabatta Rolls
Ingredients
- 1 cup active sourdough starter 250 grams
- 3 cups flour 500 grams, bread flour works best but all purpose is fine.
- 1 1/2 cups warm water 350 grams
- 1 teaspoon salt 10 grams
Instructions
- In a large mixing bowl, combine 1 cup of active sourdough starter with 1 1/2 cups of warm water.

- Add 3 cups of bread flour to the bowl and mix until a sticky dough forms.
- First Rise – Cover the bowl with a damp tea towel and let the dough sit at room temperature for 12 hours, or overnight.
- The Next Day: 4. After 12 hours, the dough should have risen and be bubbly. Add 1 teaspoon of salt to the dough and mix well.
- Let the dough rest for another 30 minutes.
- First Stretch – Turn the dough out onto a floured surface and stretch and fold the top of the dough over the bottom, in half… Then turn the dough 90 degrees and do it again. Repeat on all 4 sides of the dough ball. This is a high hydration dough or wet dough, so if the dough is too sticky use wet fingers or hands with cold water before! Repeat this process for 10 minutes, until the dough becomes smooth and elastic.
- Place the dough back into the mixing bowl and cover it with a damp kitchen towel. Let it rest for 1 hour.
- After 1 hour, Turn the dough out onto a floured surface and stretch and fold the top of the dough over the bottom, in half… Then turn the dough 90 degrees and do it again. Repeat on all 4 sides of the dough ball.
- Place the dough back into the mixing bowl and cover it with a damp kitchen towel. Let it rest for another 1 hour.
- Preheat your oven to 425°F (218°C).
- Divide the dough into 8-10 equal rectangular shape pieces.
- Place the rolls onto a baking sheet pan lined with a piece of parchment paper and let them rest for another 30 minutes.
- Bake the rolls in your hot preheated hot oven for 20-25 minutes, until they are golden brown and sound hollow when tapped.
- Let the sourdough ciabatta rolls cool completely before serving!


Notes
- Use a kitchen scale: To ensure accurate measurements and consistent results, it's important to use a kitchen scale to measure your ingredients.
- Adjust the hydration level: Depending on the consistency of your sourdough starter, you may need to adjust the hydration level of the dough. If the dough seems too dry or stiff, add a little more water. If it seems too wet or sticky, add a little more flour.
- Allow plenty of time for fermentation: The longer you allow the dough to ferment, the more flavor and texture it will develop. Don't rush the process – give the dough plenty of time to rest and rise.
- Be gentle when shaping the sourdough ciabatta rolls: Ciabatta dough is very wet and sticky, so it's important to handle it gently when shaping the rolls. Use a light touch and try to avoid adding too much extra flour.
Nutrition

About Juliea
Juliea is a mother of six, a sourdough baker, and a homestead builder living in Idaho. Alongside her husband and their horse, Dude, she manages a busy farmhouse and shares her love for scratch-cooking and simple homemaking. Through her blog and YouTube channel, she helps millions of families every year master the art of the handmade home.