


I’m thrilled to share with you my personal take on the best cherry pie recipe, using homemade canned cherries in juice. This delightful dessert showcases the irresistible flavors of sour cherries for classic cherry pie we all love.

The Best Cherry Pie Recipe!
This cherry-filled pie recipe is truly the best, and let me tell you why! First, we make our own cherry pie filling from scratch, allowing you to control the tart flavor and achieve the perfect balance of sweet and tart. By combining flour with a cornstarch slurry, we create a thick and luscious filling that holds its shape beautifully.
But what truly sets this recipe apart is the flaky crust. With a flaky crust recipe that uses just the right amount of butter, a little flour, and a delicate touch, you get a crust that is tender and crisp… A pie with a buttery crust that melts in your mouth… And the perfect vessel for our homemade filling!

You might usually grab sweet cherries for snacking, but for this classic cherry pie, sour cherries (also called tart cherries) are where it’s at!
They’re the secret to that amazing sweet-tart balance we all love in cherry pie. Sweet cherries can too sweet when baked, but the bright tang of sour cherries cuts right through, so every bite flavorful. It’s the traditional taste you’re looking for! Plus, they break down perfectly when baked, giving you that luscious, not-too-mushy, classic cherry pie filling.
Cherry Pie Recipe Filling
Speaking of the filling, this cherry-filled pie is a celebration of preserved canned cherries. These little gems, packed in their own juice, deliver the perfect burst of sweetness and juiciness to every slice. Combined with my pie dough recipe, you’ll bake a butter crust that complements the cherries, so their natural flavors shine through.

A Recipe Walk Through
Baking a beautiful cherry pie from scratch might seem intimidating, but I promise it’s a straightforward and fun process! It all comes down to three main phases. Here’s my game plan:
First, we’ll tackle the flaky pie crust. This is the foundation of our pie, and the secret is all in keeping our ingredients cold to get that perfect, tender, and buttery texture.
Next, we’ll make the luscious cherry filling. We’ll cook down our canned cherries and their juice with a few simple ingredients to create that beautiful, thick, and perfectly tart-sweet filling.
Finally, we’ll bake our masterpiece! We’ll fill the crust, top it with a lattice, and bake it until the crust is golden and the filling is bubbling. The result is a stunning pie that you can be so proud of!
Pro Tips & Tricks for Perfect Cherry Pie
Here are some of my tips and tricks to take your homemade cherry pie to the next level!
Keep it Cold, Cold, Cold: The secret to a flaky, tender pie crust is cold ingredients. Make sure your butter is straight from the fridge and cut into small cubes. Even your water should be icy cold. This prevents the butter from melting into the flour, which can lead to a tough crust.
Don’t Overmix the Dough: Once you add the wet ingredients to the dry, mix just until everything comes together. Overmixing develops the gluten in the flour, resulting in a tougher crust. A shaggy dough with some visible butter pieces is exactly what you’re looking for.

Chill Out: Don’t skip the chilling time for the dough! Refrigerating the dough allows the gluten to relax, making it easier to roll out and less likely to shrink during baking. Plus, it helps the butter solidify again, contributing to flakiness.
Juice Control is Key: If your filling seems very liquidy after cooking, you can add an extra teaspoon of cornstarch.
Taste Your Filling: Before pouring the filling into the crust, give it a taste! Adjust the sugar or lemon juice according to your preference. Remember that the flavors will intensify slightly as it bakes.

Protect Those Edges: If you notice your crust edges browning too quickly during baking, you can loosely cover them with aluminum foil or use a pie crust shield.
Let it Cool Completely: This is the hardest part, but crucial! The filling needs time to set properly after baking. If you slice into it too soon, it will be runny. Aim for at least 2-3 hours of cooling time at room temperature.
Serving Suggestions: While this pie is fantastic on its own, it’s truly elevated with a scoop of creamy vanilla ice cream, a dollop of fresh whipped cream, or even a drizzle of warm caramel sauce.
Ingredient Substitutions
Let’s talk about some of the key ingredients in this recipe and some helpful notes for substitutions!
- All-Purpose Flour: For this recipe, standard all-purpose flour (bleached or unbleached) works perfectly. There’s no need for fancy pastry flour or bread flour here.
- Unsalted Butter: This recipe calls for unsalted butter in both the crust and the filling. The reason is simple: control! Different brands of salted butter have varying amounts of salt, which can make it tricky to get the seasoning just right. By using unsalted butter, you can add your own measured amount of salt, ensuring a perfectly balanced flavor every time. If you only have salted butter on hand, you can use it, but omit the added salt in the pie crust and taste your filling before adding any extra.
- White Vinegar (in the crust): You might be surprised to see a tablespoon of white vinegar in our pie crust recipe, but it’s a little secret for extra tenderness! The acidity in the vinegar helps to inhibit gluten development in the flour. Less gluten means a more tender, less tough crust that’s easier to roll out and incredibly flaky. Don’t worry, you won’t taste the vinegar in the final baked pie! You can also use apple cider vinegar.
- Almond Extract: The almond extract in the cherry filling truly complements the tart cherries, enhancing their natural sweetness with a subtle note. But if you’re not a fan of almond flavor or don’t have it: You can swap it out for an equal amount of vanilla extract for a classic, universally loved flavor profile. Or you can just omit the it entirely. The pie will still be delicious, just with a slightly less complex flavor.
- Cornstarch: Our recipe uses cornstarch to thicken the cherry filling, creating that beautiful, glossy, and sliceable consistency. If you need an alternative, tapioca starch (also known as tapioca flour) is an excellent substitute. You can use the same amount of tapioca starch as cornstarch (1:1 ratio). Tapioca starch makes a clearer and glossier finish, and it can also withstand longer cooking times without breaking down as easily as cornstarch. 😉
More Recipe
Blueberry Pie with frozen blueberries
I want to know what YOU think, Please review the recipe card!
The Best Cherry Pie from Canned Cherries with Flaky Crust
Ingredients
- Pie Crust Ingredients:
- 2 ½ cups all-purpose flour
- 1 teaspoon salt
- 2 tablespoons granulated sugar
- 1 cup unsalted butter cold and cut into small cubes
- 1 large egg beaten
- 1 tablespoon white vinegar
- 4-5 tablespoons cold water
- Cherry Filling Ingredients:
- 1 quart or 2 cans of cherries in juice see canned cherries recipe
- 1 cup cherry juice reserved from the canned cherries
- 1 cup granulated sugar
- 1/3 cup cornstarch
- 1 tablespoon lemon juice
- ½ teaspoon almond extract
- For Assembly
- 1 egg beaten (for egg wash)
- Coarse sugar for sprinkling
Instructions
How to Make Cherry Pie Recipe
Preheat the oven to 375°F (190°C).
1. Prepare the pie crust:
- 2. In a large bowl, combine the flour, salt, and sugar.
- 3. Add the cold butter cubes to the flour mixture and cut them in using a pastry blender or your fingers until the mixture resembles coarse crumbs.
- 4. In a small bowl, whisk together the beaten egg and vinegar. Pour this mixture over the flour-butter mixture.
- 5. Gradually add the cold water, one tablespoon at a time, mixing until the dough just comes together.
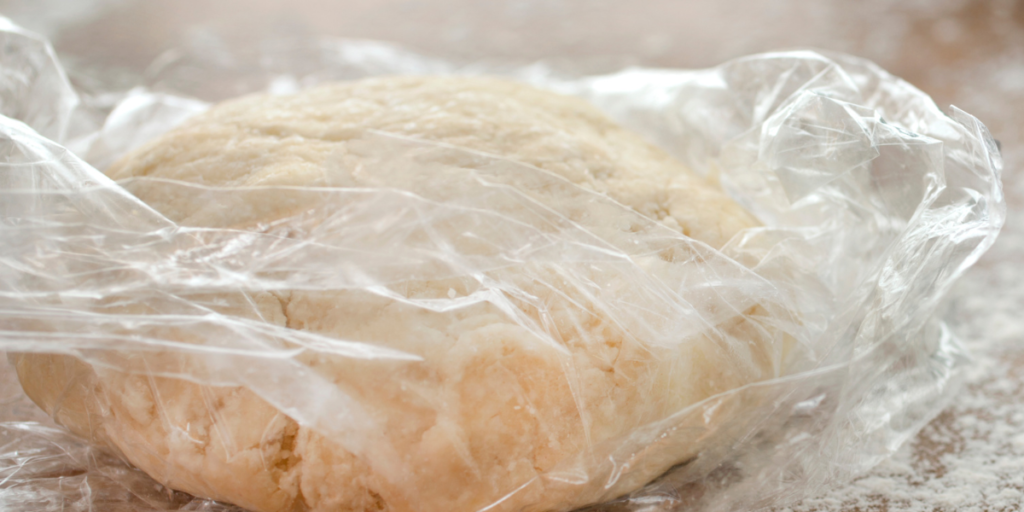
- 6. Divide the dough into two equal portions, shaping each into a disk. Wrap each disk with plastic wrap and refrigerate for 30 minutes.
Prepare the cherry pie filling
- Drain the canned cherries, reserving 1 cup of cherry juice.
- In a medium pot, combine the cherry juice, granulated sugar, cornstarch, lemon juice, and almond extract.
- Cook over medium heat, stirring constantly until the mixture thickens and becomes glossy.
- Add the drained cherries to the pot and gently stir to coat them with the filling. Remove from heat and set aside to cool to room temperature.
Roll out the bottom crust
- On a lightly floured surface, roll out one disk of dough into a circle large enough to fit a 9-inch pie pan.
- Carefully transfer the rolled-out dough to the pie dish, gently pressing it into the bottom and sides of the pan. Trim any excess dough hanging over the edges.
Add the cherry pie recipe filling
- Pour the cooled cherry filling into the prepared pie shell, spreading it evenly.
- Create the lattice top crust
- Roll out the second disk of dough into a circle on a lightly floured surface.
- Using a sharp knife or pizza cutter, cut the dough into strips, about ½-inch wide.
- Lay half of the strips horizontally across the pie, leaving even spacing between each strip.
- Fold back every other strip halfway, then place a strip vertically across the unfolded strips.
- Unfold the folded strips back over the vertical strip.
- Fold back the remaining horizontal strips, placing another vertical strip across the unfolded ones.
- Repeat this process, alternating the strips in opposite directions, until you've created a lattice pattern on top of the pie.
- Seal and crimp the pie Top
- Trim the excess dough from the lattice edges, leaving a slight overhang.
- Fold the overhanging lattice and bottom crust edges together and crimp to seal the pie.
- Brush with egg wash & sprinkle with coarse sugar!
- Lightly beat an egg in a small bowl. Using a pastry brush, gently brush the lattice crust and edges of the pie with the beaten egg.
- Sprinkle coarse sugar evenly over the top of the pie for added.
- Bake at 375 degrees F for 45-55 minutes. Keep an eye on the pie as it bakes, and once the crust turns a golden brown color and the filling is bubbling on top, it's a good indication that the pie is done. Baking times may vary slightly, so it's always a good idea to check for visual cues of doneness. Once baked to perfection, remove the pie from the oven and allow it to cool before slicing and serving!
- This pie is delicious on it's own and heavenly with a scoop of vanilla ice cream!
Video
Nutrition

About Juliea
Juliea is a mother of six, a sourdough baker, and a homestead builder living in Idaho. Alongside her husband and their horse, Dude, she manages a busy farmhouse and shares her love for scratch-cooking and simple homemaking. Through her blog and YouTube channel, she helps millions of families every year master the art of the handmade home.


15 comments
Dixe
First, this pie crust is next level! Perfectly flaky and easy to follow instructions. Then you add the cherries in and BAM the best calories you’ve ever consumed. Just make it. You won’t regret it.
Martinique
Thank you for sharing. I just made it and it’s delicious and so so easy to follow instructions . I’ll definitely be making this again thank you very much.
Juliea Huffaker
Hi Martinique! Thank you so much for the review! I’m thrilled to hear the pie was a hit. I’ve found that using canned cherries is one of my favorite “hacks” for getting that deep, traditional flavor without the hours of pitting.
If you ever want to dress it up for a special occasion, try brushing the top crust with a little bit of heavy cream and a sprinkle of coarse sugar before baking—it gives it that bakery-style crunch… Happy baking!
Pam
I made this for Thanksgivings, using cherries I had canned over the summer, it was very good, I did use a little more cornstarch as it was a little thin for my liking. I used my own pie crust recipe, so I can’t speak to that. My guests loved it too.
Allen Christensen
You list the baking time as 45-45 min. What is the correct times?
Juliea Huffaker
Hi Allen, thanks for pointing that typo out. It is 45-55 minutes.
Dusty
Oh, my goodness! This looks SO delicious! I love me some cherry pie too! Yum 🙂
Hannah
I love a cherry pie, this looks so easy to make!
Nikki
I’m a sucker for cherries and this looks heavenly! Adding it to my recipe list.
Alicia
Looks delish! I have both sweet and sour baby cherry trees and I hadn’t planned on canning them because I don’t like canned pie filings. But using the canned cherries and then turning them in to pie filling is genius! And now I know how I’ll preserve some when my trees produce!
Renee Schiepers
Jummy I love cherry pie! I think I know what to make this weekend!! Never had homemade cherry pie, thank you for sharing your recipe.
Eva
I will definitely need to save this cherry pie recipe to try one day with my kids!
Maddie L.
This cherry pie recipe sounds delicious! Will have to give this a try! 🙂
Julie
I absolutely love cherries, I will have to try canning my own though because storebought canned cherries always taste way more sour than sweet which is a shame! But this looks so delicious, my mouth is watering lol…
Kimberley
Aww man!! This looks amazing.. I love cherry pie soooo much!